Using iPLAss' workflow function, you can create flows that meet various requirements. Here, we will explain how to create a workflow, divided into preparation, basic, and practical sections.
-
Preparation Section
I will briefly explain the overview of the workflow and the workflow in iPLAss. -
Basic Section
We will explain how each event works and how to set it up while creating a simple workflow. -
Practical Section
We will create a more realistic workflow using the content explained in the basics.
1. Prerequisite
This tutorial assumes the following condition was done: Before proceeding with the tutorial, do one of the following to prepare the environment where the Web application operates.
-
This tutorial can only be performed with the Enterprise Edition.
To upgrade an open source version to Enterprise Edition, see Upgrade to Enterprise Edition.
For Docker, use the Enterprise Edition Docker image.
-
When operating the GEM screen as User Admin (default administrator user), please switch to the "DEFAULT" menu from "Change Menu". In this tutorial, we omit setting permissions for menus, etc.
2. Preparation Section
2.1. The Overview of WorkFlow
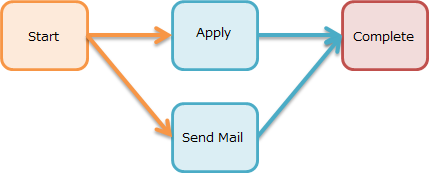
Workflow refers to a series of business processing procedures.
For example, "An employee requests a vacation, the supervisor approves it, and the employee takes the vacation after confirming the supervisor’s approval."
Although the flow is simple, it is a workflow.
This flow is shown below.

An iPLAss workflow consists of objects called "workflow items" (hereinafter referred to as Items).
Items are classified into five categories: Activity (Task) Event Gateway Flow and Variable.s
A brief description of each category is provided in the table below.
| Category | Description |
|---|---|
Activity (Task) |
Item category that defines processing (task). This corresponds to the "leave request" and "supervisor approval" parts in the diagram above. |
Event |
This is an Item category that defines the trigger and end of processing. This corresponds to the "Complete" part in the diagram above. |
Gateway |
Item category that defines flow branches or connections. |
Flow |
Item category that defines the processing order. This is the part corresponding to the arrow in the diagram above. |
Variable |
This is an Item category that defines variables shared within the flow. |
Each category has several types of items. For details on Item, please refer to description of each item below.
2.2. Explanation for Each Item
Activity(Task)
A task that can call iPLAss commands. Use this when you want to perform logical processing in a workflow.
This task assigns tasks to the specified users and distributes the processes based on the responsive result. By assigning a user who will set approval or denial in the response, the workflow can select and continue on corresponding subsequent process.
You can update the target Entity by specifying VariableItem, which will be explained later.
The task which define/specify the MailTemplate so to send mails.
It is possible to call a predefined Workflow as a SubProcess. This is not covered in this tutorial.
Event
This event is executed first when the workflow is started. When this event is started, the workflow status becomes "ACTIVE". One and only one start event must be defined for each workflow.
An event to end the workflow. The workflow status becomes to "COMPLETED" once reaching this event.
The event to log the workflow history. This event do nothing in particular, it just log the information and then proceeds to the subsequent flow.
This event has a timer function. You can specify the execution date and time and the execution delay time of subsequent events.
An event to cancel the workflow. The difference from EndEvent is the status after completion. When Termination is executed, the status of the Workflow becomes "CANCELED".
Gateway
Used in branching process. It will execute all subsequent Flows(All branches).
Used in branch processing. Execute one of the subsequent Flow. This will not covered in this tutorial.
Used in join process. Subsequent process is performed when one of the preceding process reaches this node. It is executed each time the previous process arrives.
Used in join processing. Subsequent processing is performed when all of the previous processing is completed.
Flow
It is used to link Activity (Task), Event, and Gateway items. Processes are executed in the order connected by SequenceFlow. Depending on the settings of the transition source Item, you can add conditions and branching processes.
Variable
You can store objects that are referenced in the Workflow. When starting a workflow from an entity, the registered entity data can be used in the workflow by using variableItems. Also, this variable must be configured to enable text messages during process execution and to decide whether buttons can be displayed.
2.3. Method of Operation
Some operations are necessary to create objects for workflow with AdminConsole.
To start with the basic operations, please check the Tutorial(Basics).
Creating Workflow
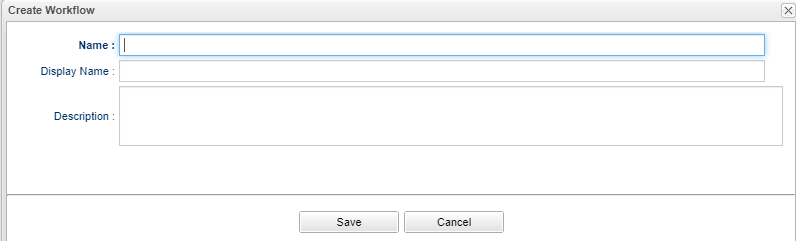
Open AdminConsole, and right-click on Workflow like we did for Entity MetaData in previous tutorials, and click "Create Workflow".
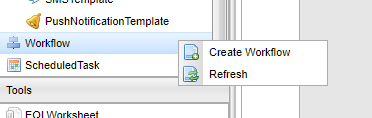
Set any name of the MetaData in Name and click the Save button.
Edit WorkFlow
Double-clicking the created MetaData, an empty Workflow setting screen will be displayed.
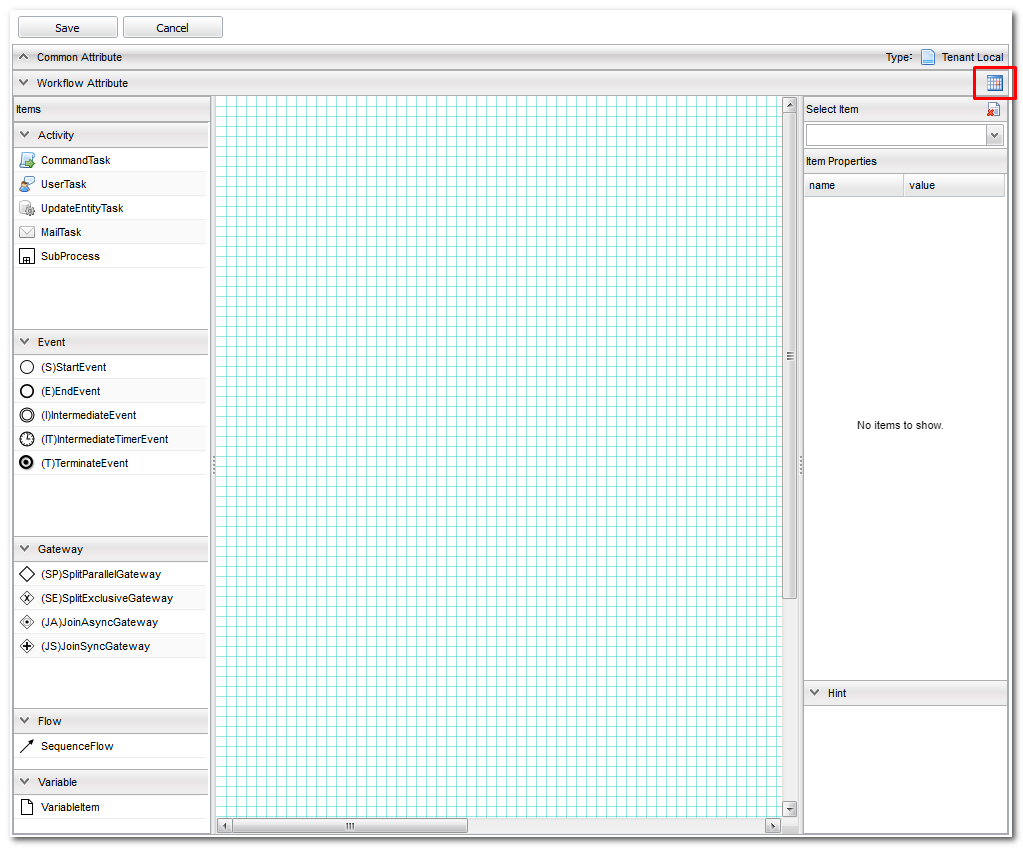
Click the frame icon in the upper right with red square to toggle the light blue grid line.
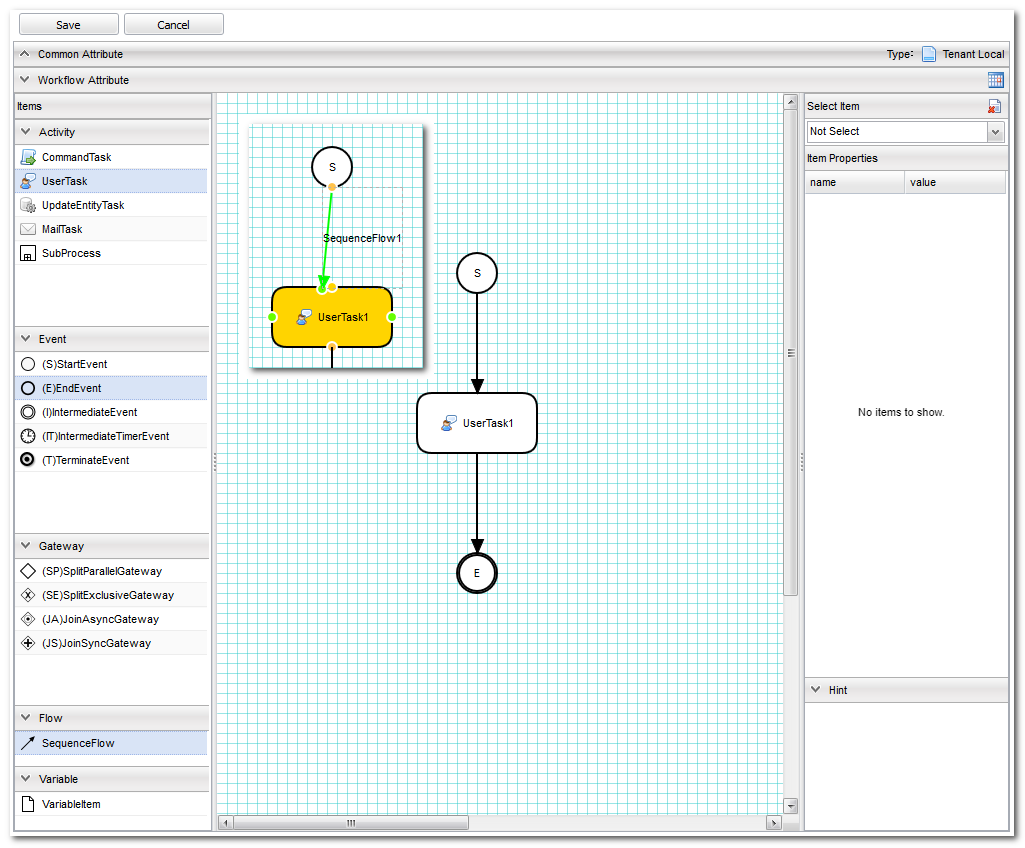
Drag items from the left pane of the screen and drop to the center pane to assemble the workflow. Connect each item placed with SequenceFlow. SequenceFlow is adsorbed by dragging near the item to be connected.
Click the target item to select it. The setting properties of the selected item are displayed on the right side of the screen. Click the "×" icon on the top right to delete the target item. You can also delete by right-clicking the target item.
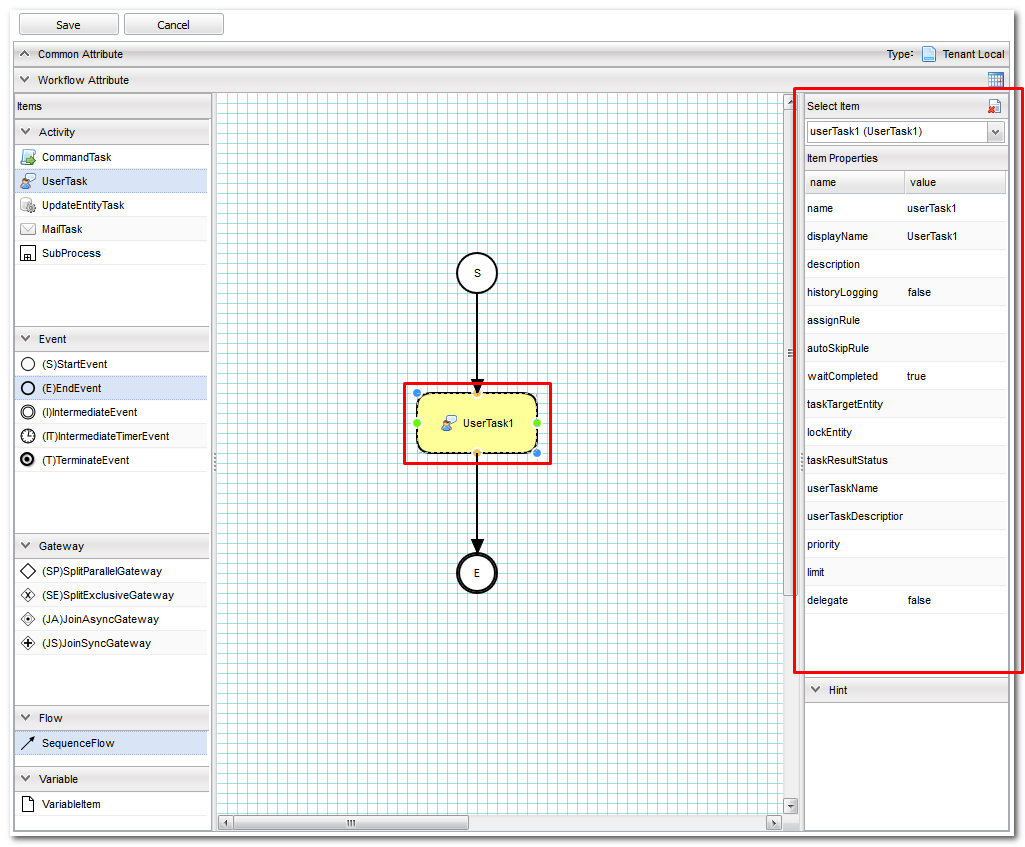
Right-clicking SequenceFlow not only allows you to "Delete item", it also has an option of "Change number of points". With 3Point, SequenceFlow can be folded and bent to fit complicated flows.

Task Overview
A task list overview is provided as a tool to check the status of the workflow being executed and the target data of the workflow. The task list is used to check the workflow completion and task execution history in both the basic and practical sections. Follow the steps below to make the task list displayable.
By default, the task list is set to not displayed. It is necessary to change this setting from TopView setting screen at AdminConsole.
-
The settings of TopView
Data called "DEFAULT" is registered in TopView of AdminConsole in advance.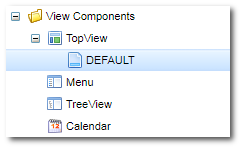
The following screen will be displayed when double-clicking the node. Drag and drop "UserTaskList" in the "Workflow" folder in Items on the right side of the screen to the MainArea. "UserTaskList" will be added.
-
Settings of UserTaskList
The UserTaskList setting dialog is shown below. This time, we will set UserTaskView. Open the part settings screen and click "UserTaskView Setting".
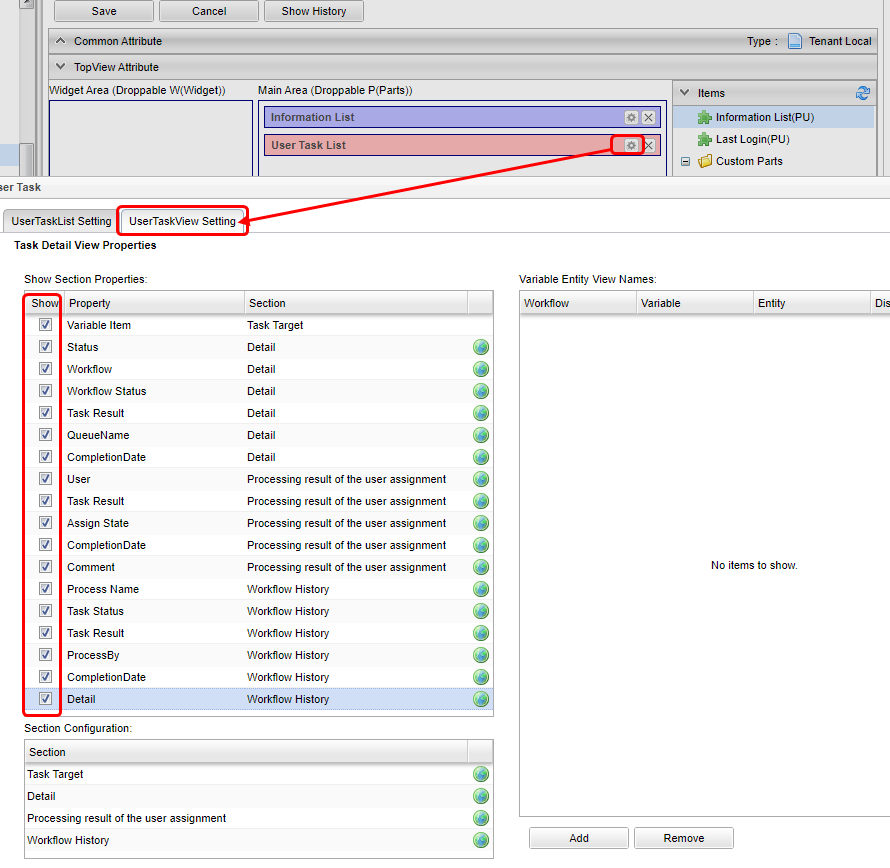
By default, all the display items are not checked. This time we want to see the workflow features such as the workflow history and the assignment status, so please check all of them.
Finally, click "OK" and click the
Savebutton on the Topview itself to save the settings. -
Check The Display
The task list is displayed on the top screen.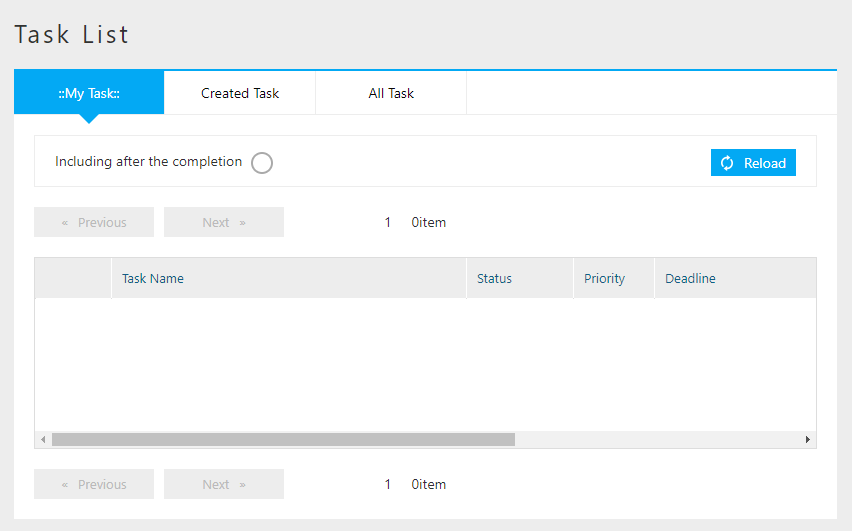
3. Basic Section
In the basics section, we will explain workflow functions using simple processing examples.
3.1. Simple Approval
This section mainly explains how to use the basic functionality of UserTask. Consider a flow where a user registered data, and want someone to confirms and approve about it.

Preparation
Please refer to the following to prepare the user who will approve the workflow.
| Item name | Setting value |
|---|---|
User Id |
authorizer@workflow |
Last Name |
Authorizer |
Mail Address |
|
Member Of |
GemUser |
Account Policy |
Standard |
Workflow Settings
Create the MetaData of Workflow as follows.
| Item name | Setting value |
|---|---|
Name |
basic/BasicWorkflow001 |
DisplayName |
BasicWorkflow001 |
Description |
Simple approval |
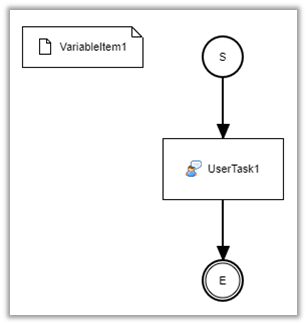
Display the created workflow and create the workflow shown below. Refer to operation method for specific operations.
We will Configure about each item. Setting is not required for items that are not listed.
-
VariableItem
Item name Setting value name
variableItem1
displayName
VariableItem1
*By setting the value of name to the variable when starting the workflow of EntityView, the data of the target Entity can be used in Workflow.
-
StartEvent

Item name Setting value name
startEvent1
displayName
StartEvent1
true
-
EndEvent

Item name Setting value name
endEvent1
displayName
EndEvent1
historyLogging
true
-
UserTask

Item name Setting value name
userTask1
displayName
UserTask1
historyLogging
true
assignRule
see assignRule below
taskResultStatus
see taskResultStatus below
-
assignRule
We will set assignRule. assignRule sets who processes this UserTask.
Please refer to the link for descriptions of each of the following settings.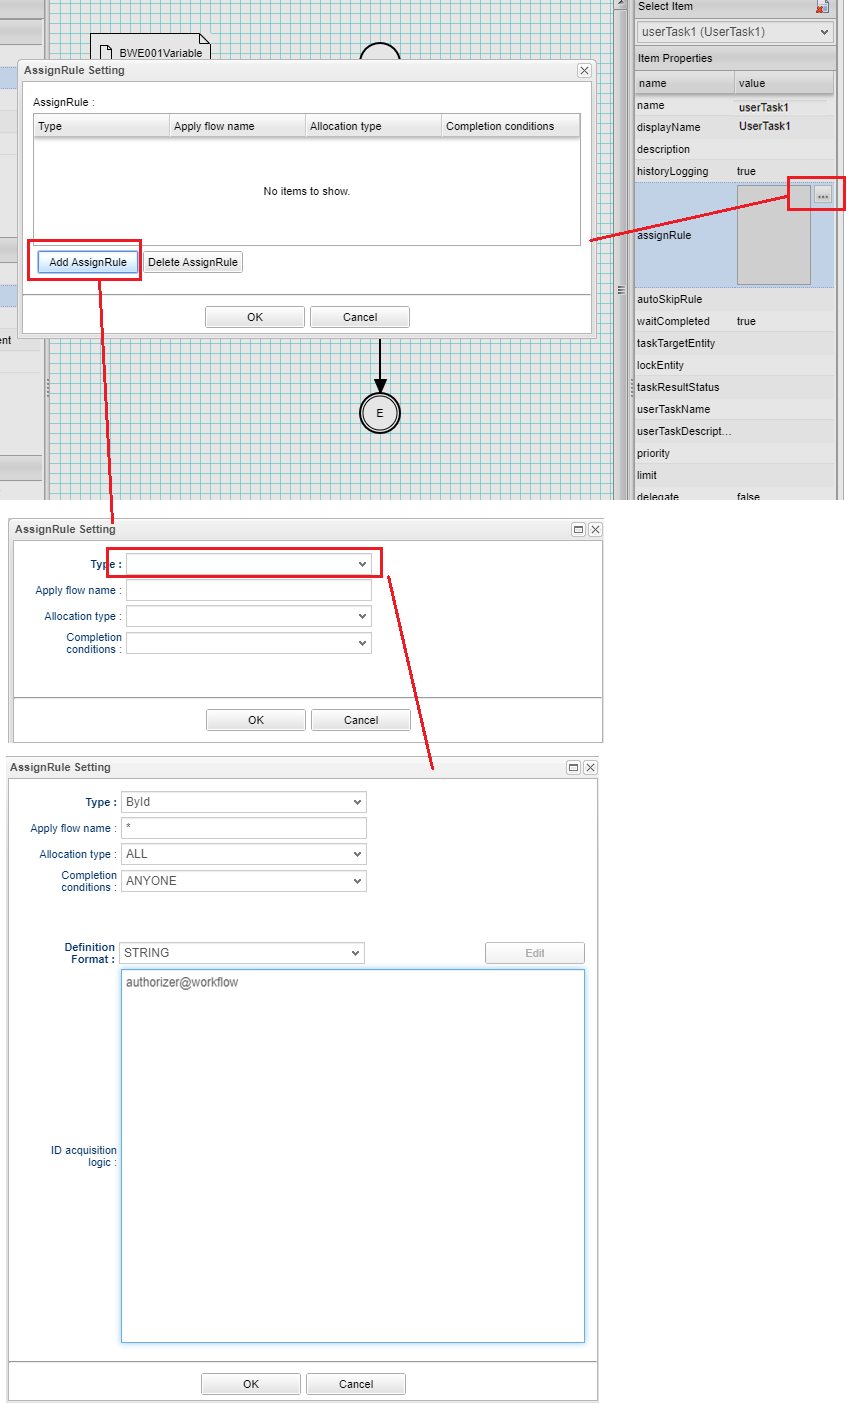
Item name Setting value Type
ById
Apply flow name
*
Allocation type
ALL
Completion conditions
ANYONE
Definition Format
STRING
ID acquisition logic
authorizer@workflow
-
taskResultStatus
Set taskResultStatus. By setting taskResultStatus, it is possible to branch the process by approval or rejection. This time, use only approval.
For detailed instructions, please refer to the link.
Item name Setting value name
ok
displayName
approved
There is no need to branch this time, so we will only set ok (approval). As shown below, the value set here is displayed as a button on the screen after starting the workflow. If you check "Primary", the button will be highlighted.
-
The workflow settings are now complete. Click the Save button to save.
The next section will prepare you to actually use the workflow.
This part, the process are necessary to put the WorkFlow to use.
-
Create Entity
Prepare an entity called "basic.BasicWorkflowEntity001". There is no need to do anything about the property.
-
DetailFormView settings
Right-click the created Entity: "basic.BasicWorkflowEntity001", open "DetailLayout", and click theStandard Loadbutton.
Click the gear icon on the details screen to display the "DetailFormView Setting" settings screen. Set the following in the workflow settings at the bottom of the screen, add the created Workflow, and then click theSavebutton to save it.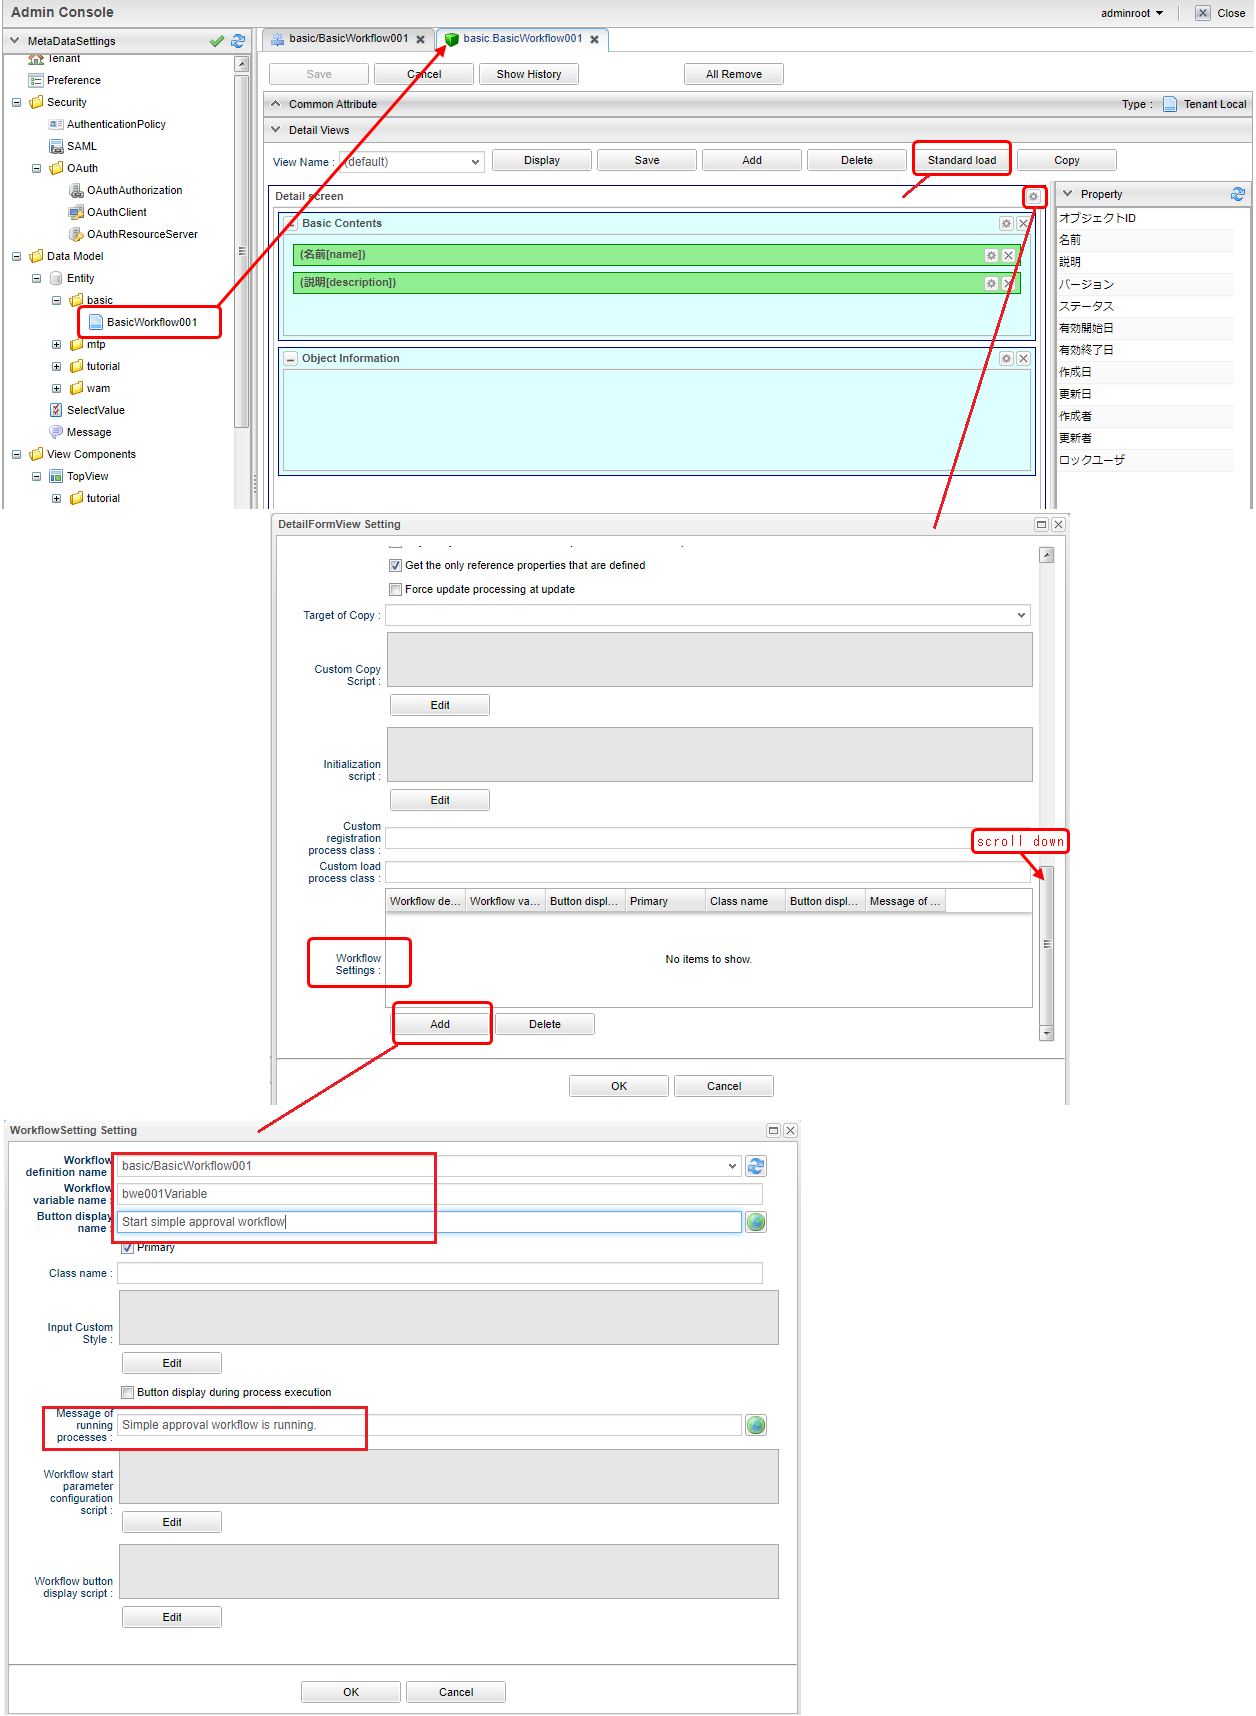
Item name Setting value Workflow definition name
basic/BasicWorkflow001
Workflow variable name
variableItem1
Button display name
Start simple approval workflow
Message of running process
Simple approval workflow is running.
Up to this point, you are ready to use this Workflow. Let’s try it from the next section.
Using Workflow
Open the search screen for "BasicWorkflowEntity001" from the GEM Entity registration screen, press the Create New button, and register any data. When you open the details screen of the registered Entity data, a button called Start Simple Approval Workflow is displayed.
This button has the button name set in EntityView. Clicking this button will launch the workflow.
|
There are two ways to start a workflow: ① start from the program, and ② start from the GEM screen. For details, see How to Use. For convenience, the workflow startup method in this tutorial uses the startup pattern from the GEM screen (the functionality of the workflow settings set in DetailFormView in the previous step), with the exception of some steps. |
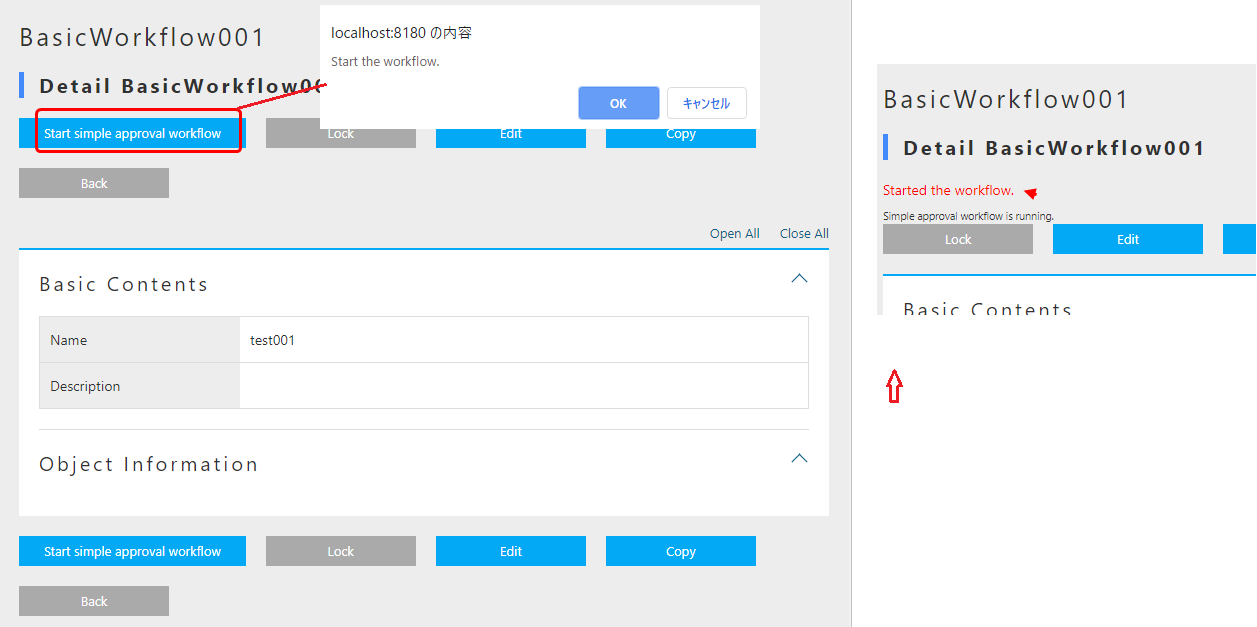
At the same time as the workflow start message, a message indicating that the process set in EntityView is "in progress" will be displayed.
Log in with user ID: authorizer@workflow and When you check the task list on the top screen, you will see that it has been assigned based on the Workflow’s assignRule.
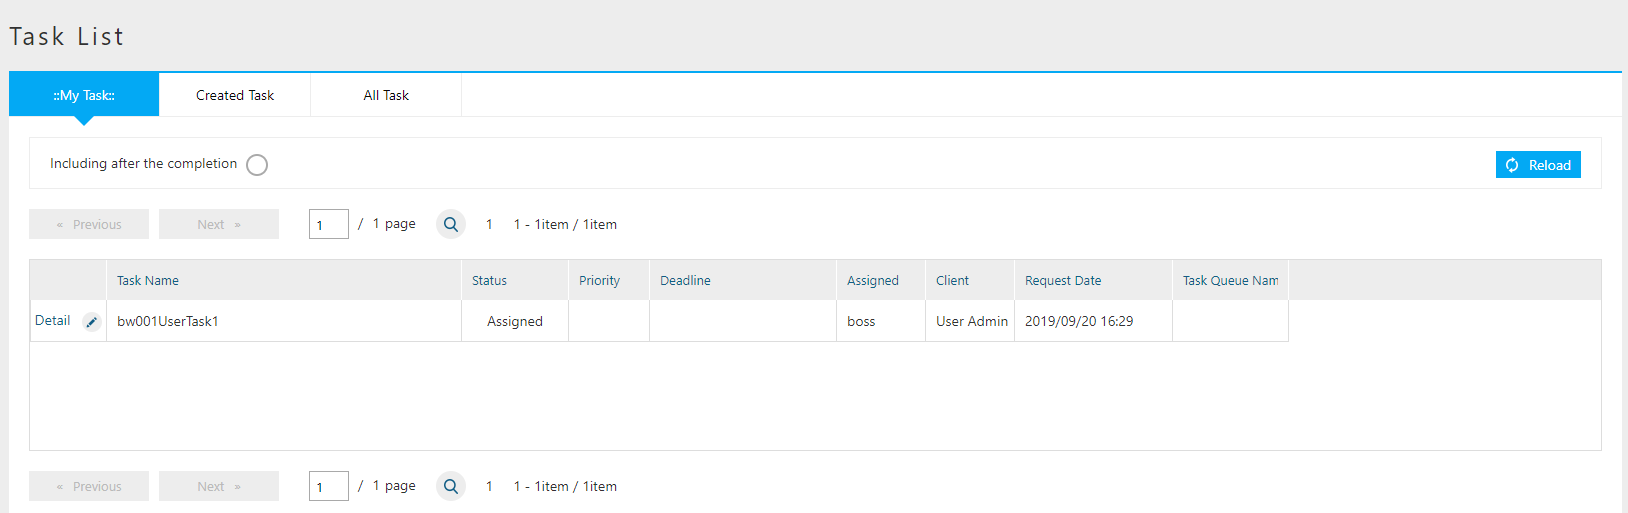
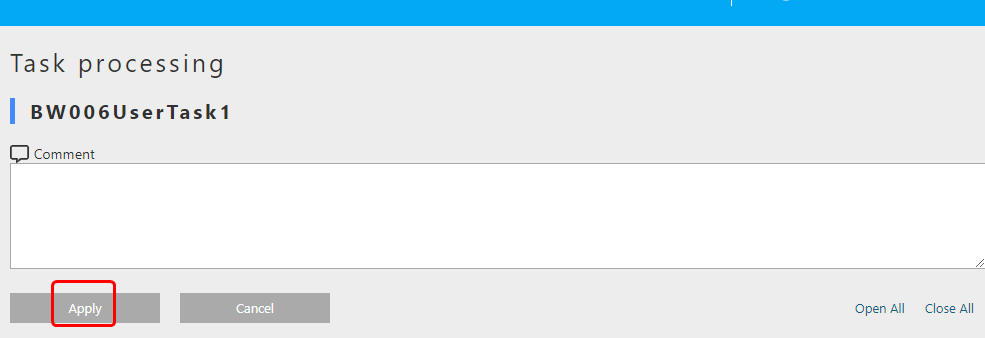
It will operate the assigned UserTask and try the approval process.
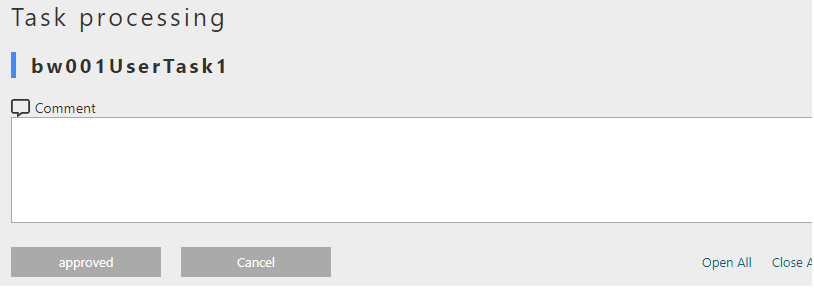
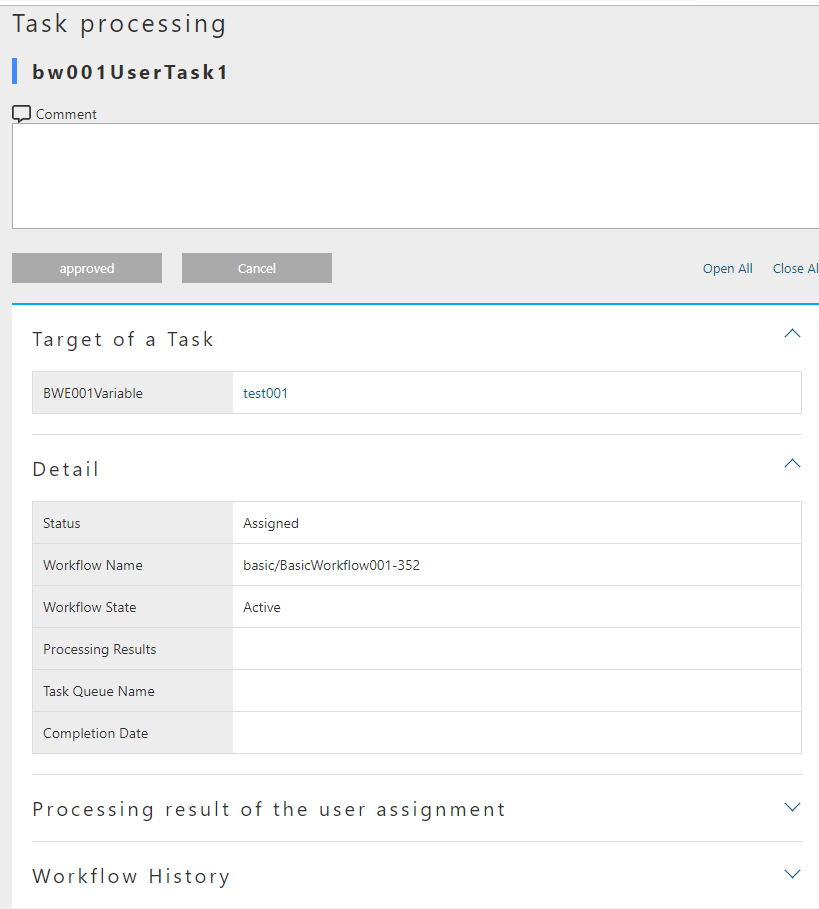
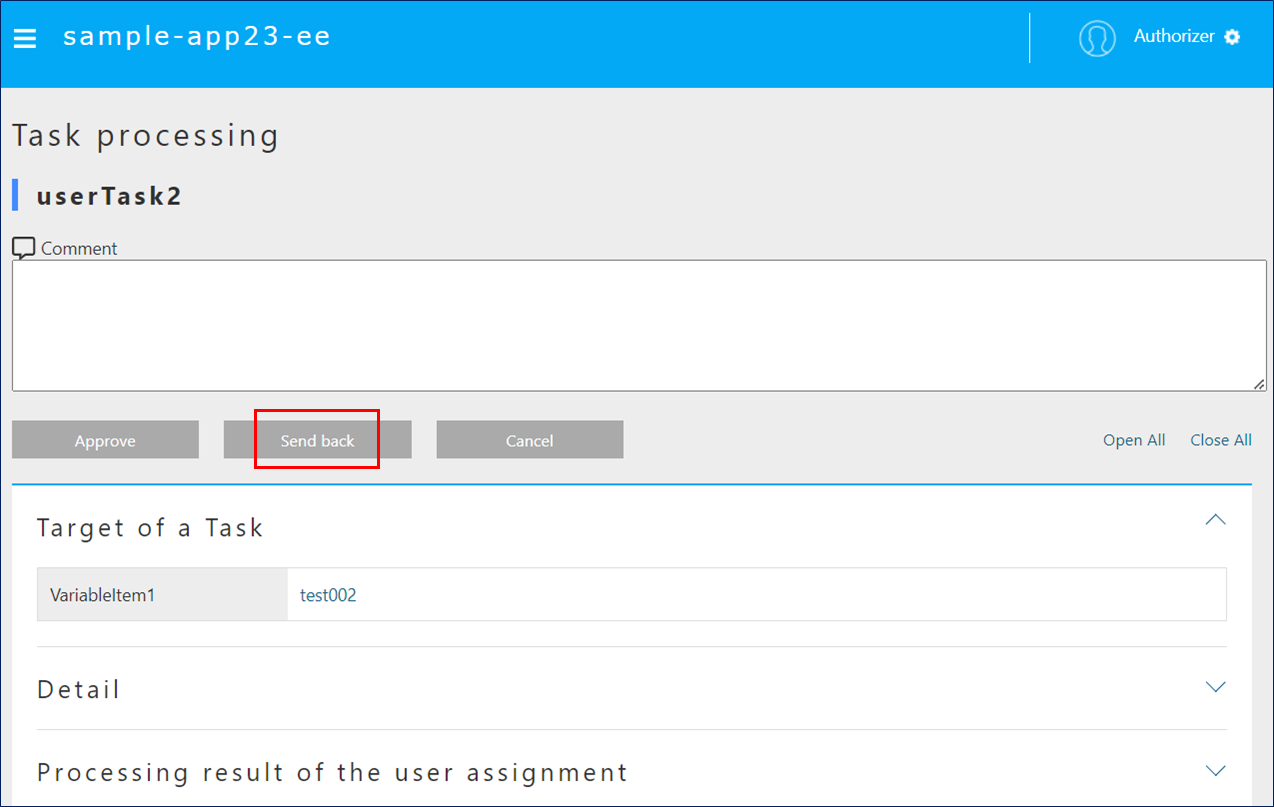
Click the "Edit" link in the task list.
The following figure is displayed.
Enter comments if necessary and click the Approve button.
This Approve button is the value set in the taskResultStatus of Workflow.
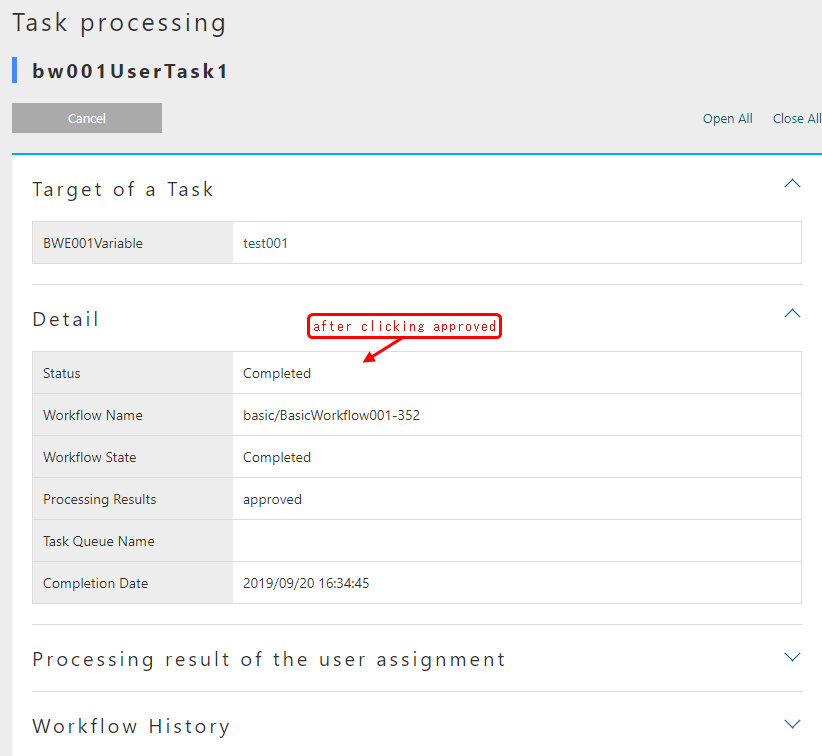
When the approval was made, this screen will reloads. Let’s check each item. You can see that the approval process is complete.
Above all, is a simple approval workflow.
3.2. Send Back
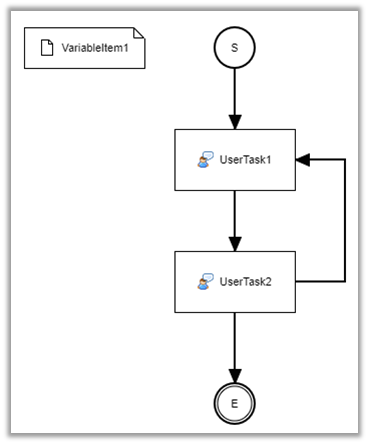
Now we will explain how to use branch process that use the result of UserTask. It is so-called NG. A user registers the data and makes an application. The approver checks the data and approves if there is no problem and reject it back if there is a problem.

Advance preparation
Please refer to the following to prepare the user who will approve the workflow.
| Item name | Setting value |
|---|---|
User Id |
user001@workflow |
Last Name |
User001 |
Mail Address |
|
Member Of |
GemUser |
Account Policy |
Standard |
Workflow Settings
Create Workflow MetaData as follows.
| Item name | |
|---|---|
name |
basic/BasicWorkflow002 |
displayName |
BasicWorkflow002 |
description |
Send back |
Display the created workflow and create the workflow shown below. Refer to operation method for specific operations.
We will configure about each item. Setting is not required for item that are not listed.
-
StartEvent
Item name Setting value historyLogging
true
-
EndEvent
Item name Setting value historyLogging
true
-
UserTask1

Item name Setting value historyLogging
true
assignRule
See assignRule below
taskResultStatus
See taskResultStatus below
-
assignRule
Item name Setting value Type
ById
Apply flow name
*
Allocation type
ALL
Completion Conditions
ANYONE
Definition format
STRING
ID acquisition logic
user001@workflow
-
taskResultStatus
Item name Setting value name
post
displayName
Apply
-
-
UserTask2
Item name Setting value historyLogging
true
assignRule
See assignRule below
taskResultStatus
See taskResultStatus below
-
assignRule
Item name
Setting value
Type
ById
Apply flow name
*
Allocation type
ALL
Completion Conditions
ANYONE
Definition format
STRING
ID acquisition logic
authorizer@workflow
-
taskResultStatus
This time, you need to register anapprovalbutton and asend backbutton.Item name Setting value name
ok
displayName
Approve
Item name Setting value name
ng
displayName
Send back
If the settings are correct, the status will be as shown below.
-
-
SequenceFlow (UserTask2 → EndEvent1)
This is the flow for approval.
Item name Setting value nodeResultStatus
ok
-
SequenceFlow (UserTask2 → UserTask1)
This is the flow for sending back.
Item name Setting value nodeResultStatus
ng
The workflow settings are now complete. Click the Save button to save.
From here on, we will explain the steps required to use the workflow.
-
Create Entity
Prepare an entity called "basic.BasicWorkflowEntity002". -
DetailFormView settings
Right-click the created Entity: "basic.BasicWorkflowEntity002", open "DetailLayout", after performing the standard load in the same way as simple approval, please set the following.Item name Setting value Workflow definition name
basic/BasicWorkflow002
Workflow variable name
variableItem1
Button display name
Return workflow activation
Message of Running Process
Send-back workflow is running.
Up to this point, you are ready to use this Workflow. Let’s try it from the next section.
Using Workflow
Please log in with an administrator account and start the workflow as well as a simple approval.
Check your workflow as you would for a simple approval.
Log in again with user ID: user001@workflow and go to the task processing edit screen.
It will be in the state that you can apply, so please click the Apply button.
After completing the application, please log in again with the user ID: authorizer@workflow. There is a request for approval for the task that was submitted earlier in the task list. Click the edit link to approve or send back.

This time, two buttons, Approve and Send back will be displayed.
It is expected to be used in such a way as to check the task target data and check the data for approval.
Click "send back" here.
Once the remand is complete, log in again with user ID: user001@workflow and confirm that the task that was remanded earlier is in the task list. Click the edit link and apply again.

Once you have finished re-applying, log in with your user ID: authorizer@workflow. Approval requests have been received for tasks that have been properly submitted to the task list. Click the edit link and now approve.
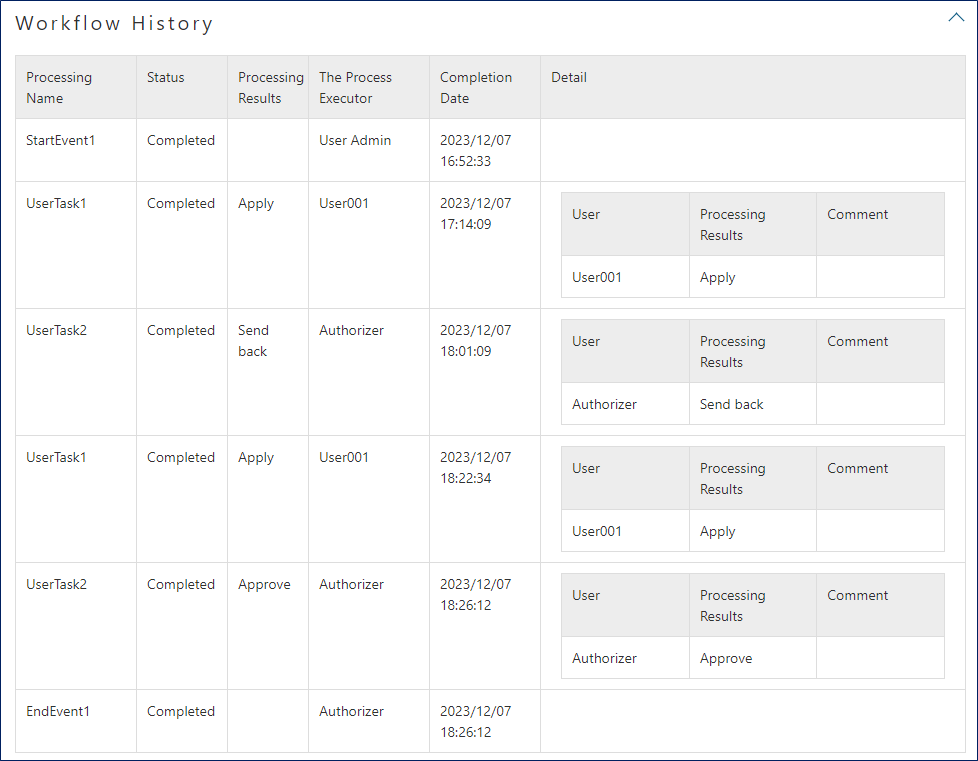
If you check the workflow history after approval, you will see the following figure. You can confirm that the processing result has been returned and that the application has been reapplied and approved.
The above is the Workflow for sending back.
3.3. Send Email Upon Approval
This section mainly explains how to send email. Imagine such situation, the user registered the data and applied the approval workflow, now he also want to send an email to the on-duty user to remind about the workflow.

Preparation
Prepare a MailTemplate called "basic/SimpleWorkflow003". Enter an arbitrary string for the subject and message.
You need to configure "mtp-service-config.xml" only if you want to check the mail locally. Please enable the MailService listener as shown below.
<!-- ■ for develop only (additional="true) ■ -->
<!-- To enable the debug mode for sending mails, Please uncomment the following code.-->
<!--
<property name="listener" class="org.iplass.mtp.mail.listeners.LoggingSendMailListener" additional="true"/> (1)
-->| 1 | Uncomment. However, please use it only in the development environment. |
Workflow settings
Create Workflow MetaData as follows.
| Item name | Setting value |
|---|---|
name |
basic/BasicWorkflow003 |
displayName |
BasicWorkflow003 |
description |
Send email |
Show the created workflow and modify it to the workflow shown below. Refer to operation method for specific operations.
We will configure about each item. Setting is not required for item that are not listed.
-
UserTask1

Item name Setting value assignRule
See assignRule
taskResultStatus
See taskResultStatus
-
assignRule
Item name Setting value Type
ById
Apply flow name
*
Allocation type
ALL
Completion Conditions
ANYONE
Definition format
STRING
ID acquisition logic
authorizer@workflow
-
taskResultStatus
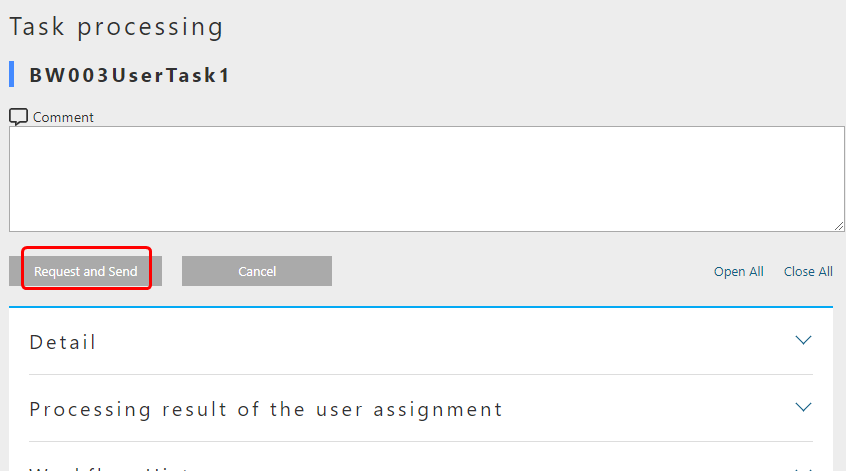
Item name Setting value name
ok
displayName
Request and send
-
-
MailTask1

Item name Setting value mailTemplateName
basic/SimpleWorkflow003
to
Item name Setting value Definition format
STRING
to get logic
-
to
Set the destination. This time, since we are not actually going to send the mail, we only want to confirmed in the log, set "test@test.jp".
-
The workflow settings are now complete. Click the Save button to save.
From here on, we will explain the steps required to use the workflow.
-
Create Entity
Prepare an entity called "basic.BasicWorkflowEntity003". -
DetailFormView settings
Right-click the created Entity: "basic.BasicWorkflowEntity003", open "DetailLayout", after performing the standard load in the same way as simple approval, please set the following.Item name Setting value Workflow definition name
basic/BasicWorkflow003
Workflow variable name
variableItem1
Button display name
start email sending workflow
Message of running process
E-mail sending workflow is being executed.
Up to this point, you are ready to use this Workflow. Let’s try it from the next section.
Using Workflow
Please log in with an administrator account and start the workflow as well as a simple approval.
Check your workflow as you would for a simple approval.
Click the Send Approval button.
The workflow is completed and an email is sent.
In the local environment, the mail contents are logged to the Eclipse console.
11:32:33.257 [http-nio-8080-exec-1] DEBUG 38 63312 CompositeCommand o.i.m.m.l.LoggingSendMailListener - From:test@contract.dentsusoken.com ReplyTo:test@contract.dentsusoken.com To:(1)test@test.jp; Cc:(0) Bcc:(0) Subject:Mail Sample FileName: PlainMessage:MailSample HtmlMessage:
The above is the Workflow that includes the email transmission process.
3.4. Entity Operation While Performing Approval
This section mainly explains the entity operation method. Image the need to update Entity data at the same time when a user registered the data and made an request.

Workflow settings
Create Workflow MetaData as follows.
| Item name | Setting value |
|---|---|
name |
basic/BasicWorkflow004 |
displayName |
BasicWorkflow004 |
description |
Entity operation |
Display the created workflow and create the workflow shown below. Refer to operation method for specific operations.
Set each item. Setting is not required for item that are not listed.
-
UserTask1

Item name Setting value assignRule
See assignRule
taskResultStatus
See taskResultStatus
-
assignRule
Item name Setting value Type
ById
Apply flow name
*
Allocation type
ALL
Completion Conditions
ANYONE
Definition format
STRING
ID acquisition logic
authorizer@workflow
-
taskResultStatus
Item name Setting value name
ok
displayName
Approve and update
-
-
UpdateEntityTask1
Item name Setting value variableName
variableItem1
updateRule
Item name Setting value Type
property
Property name
description
Updated value
Update workflow Sample
-
updateRule
When this workflow is executed and completed normally, the description of the target data will be updated with the desired value.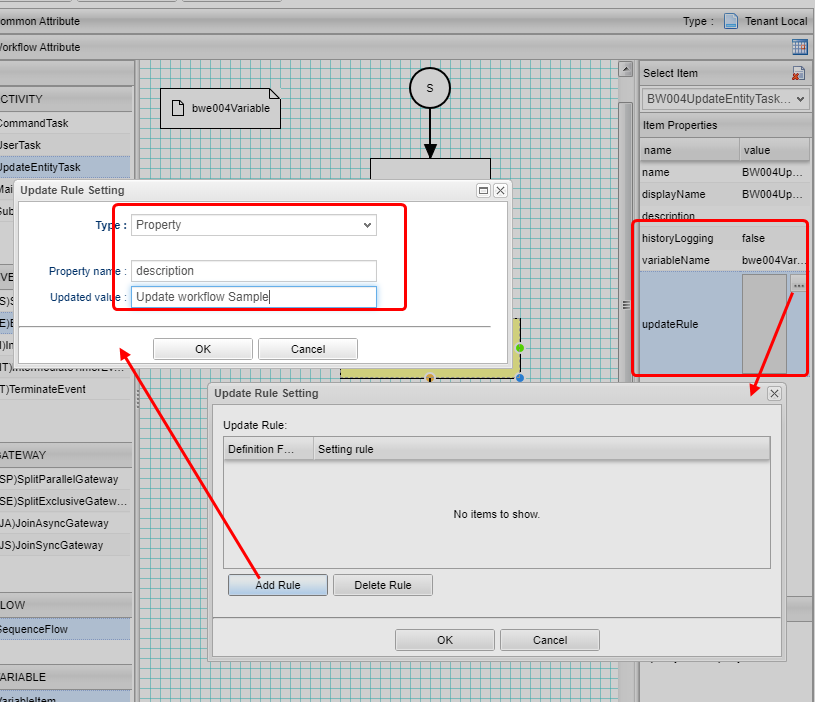
-
The workflow settings are now complete. Click the Save button to save.
From here on, we will explain the steps required to use the workflow.
-
Create Entity
Prepare an entity called "basic.BasicWorkflowEntity004". -
DetailFormView settings
Right-click the created Entity: "basic.BasicWorkflowEntity004", open "DetailLayout", after performing the standard load in the same way as simple approval, please set the following.Item name Setting value Workflow definition name
basic/BasicWorkflow004
Workflow variable name
variableItem1
Button display name
Activate Entity operation workflow
Message of running process
The Entity operation workflow is being executed.
Up to this point, you are ready to use this Workflow. Let’s try it from the next section.
Using Workflow
Please log in with an administrator account and start the workflow as well as a simple approval.
Check your workflow as you would for a simple approval.
Let’s search and check the data before and after updating from the search screen for "BasicWorkflowEntity004".
By clicking the Approve and Update button, the description field will be updated to the value set in updateRule.
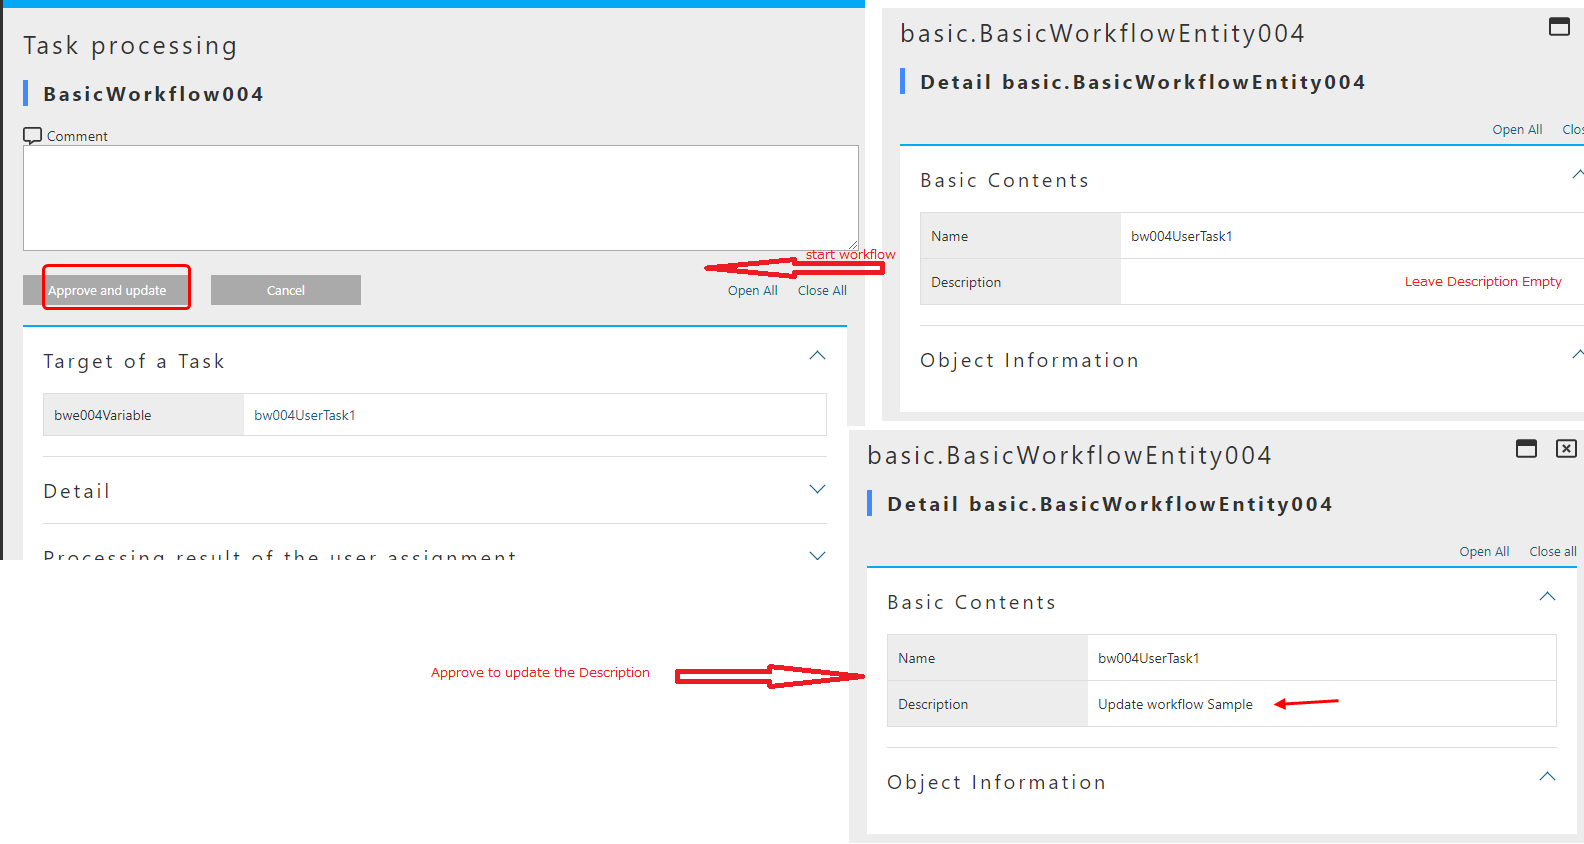
Make sure that it is updated after the workflow is complete.
The above is the workflow that includes Entity operations.
3.5. Custom Logic Process With Approval
This section mainly explains how to use custom logic. Imagine the needs for the situation that the custom logic is triggered when the user registers the data and makes an request.

Preparation
Prepare a command called "basic/BasicWorkflowCommand005". The code only outputs a log as follows.
To create a command, select "Command" on the AdminConsole screen and select "Create command" from the right-click menu. Create a Command as shown below.
| Item name | Setting value |
|---|---|
name |
basic/BasicWorkflowCommand005 |
displayName |
BasicWorkflowCommand005 |
type |
Script |
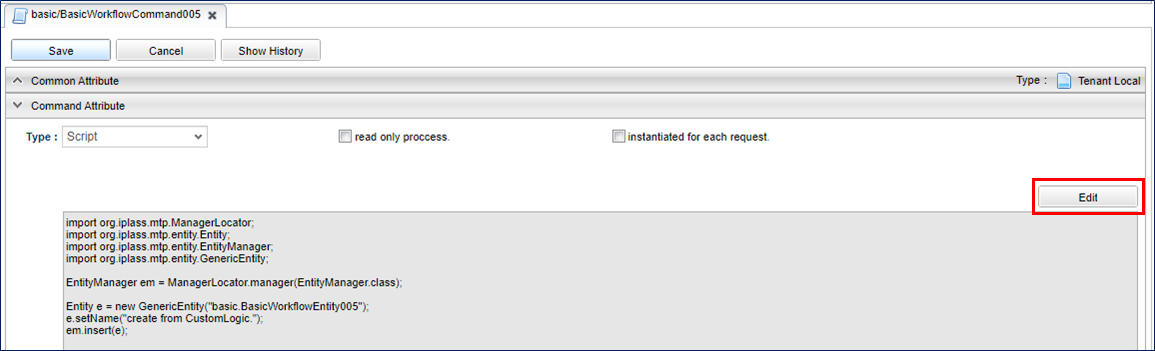
Open the created Command, set the following contents using the Edit button, and then click the Save button to save.
import org.iplass.mtp.ManagerLocator;
import org.iplass.mtp.entity.Entity;
import org.iplass.mtp.entity.EntityManager;
import org.iplass.mtp.entity.GenericEntity;

EntityManager em = ManagerLocator.manager(EntityManager.class);

Entity e = new GenericEntity("basic.BasicWorkflowEntity005");
e.setName("create by CustomLogic");
em.insert(e);
Workflow Settings
Create Workflow MetaData as follows.
| Item name | Setting value |
|---|---|
name |
basic/BasicWorkflow005 |
displayName |
BasicWorkflow005 |
description |
Custom logic processing |
Display the created workflow and create the workflow shown below. Refer to operation method for specific operations.
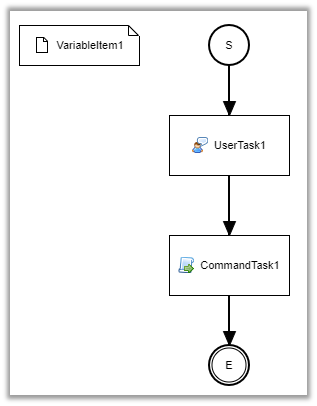
Set each item. Setting is not required for item that are not listed.
-
UserTask1

Item name Setting value assignRule
See assignRule
taskResultStatus
See taskResultStatus
-
assignRule
Item name Setting value Type
ById
Apply flow name
*
Allocation type
ALL
Completion Conditions
ANYONE
Definition format
STRING
ID acquisition logic
authorizer@workflow
-
taskResultStatus
Item name Setting value name
ok
displayName
Approve and initiate custom process
-
-
CommandTask1

Item name Setting value commandConfig
basic/BasicWorkflowCommand005
The workflow settings are now complete. Click the Save button to save.
From here on, we will explain the steps required to use the workflow.
-
Create Entity
Prepare an entity called "basic.BasicWorkflowEntity005". -
DetailFormView settings
Right-click the created Entity: "basic.BasicWorkflowEntity005", open "DetailLayout", after performing the standard load in the same way as simple approval, please set the following.Item name Setting value Workflow definition name
basic/BasicWorkflow005
Workflow variable name
variableItem1
Button display name
Custom logic processing workflow launcher
Message of running process
Custom logic processing workflow is running.
Up to this point, you are ready to use this Workflow. Let’s try it from the next section.
Using Workflow
Please log in with an administrator account and start the workflow as well as a simple approval.
Check your workflow as you would for a simple approval.
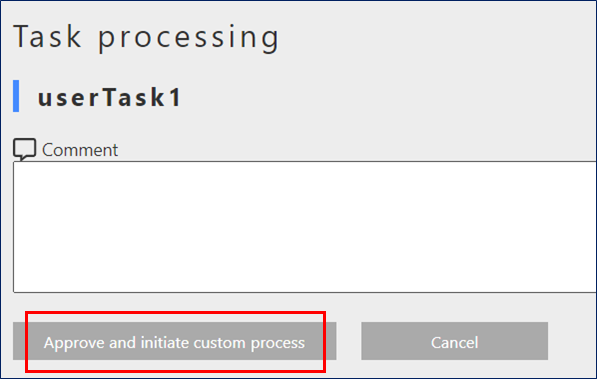
Click the Approve and initiate Custom Process button.
Search for registered data from the "BasicWorkflowEntity005" search screen and check that the data has been added using custom logic.
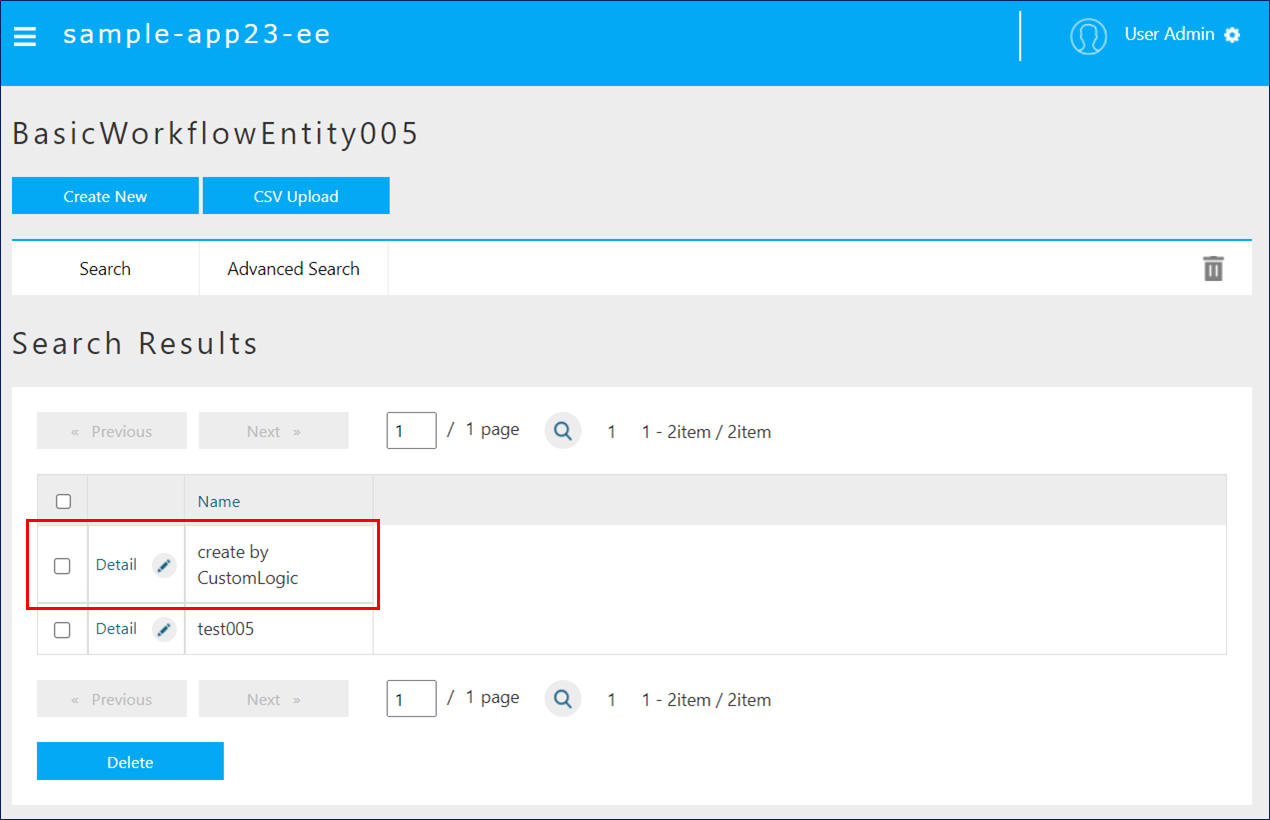
This is the workflow that includes custom logic processing.
3.6. Split
This section mainly explains how to use Gateway (Split). Imagine the needs for the situation that an email is sent and the application task for that data is triggered at the same time when a user registered the data. And end the application task once it is executed.
Workflow Settings
Create Workflow MetaData as follows.
| Item name | Setting value |
|---|---|
name |
basic/BasicWorkflow006 |
displayName |
BasicWorkflow006 |
description |
Split |
Display the created workflow and create the workflow shown below. Refer to operation method for specific operations.
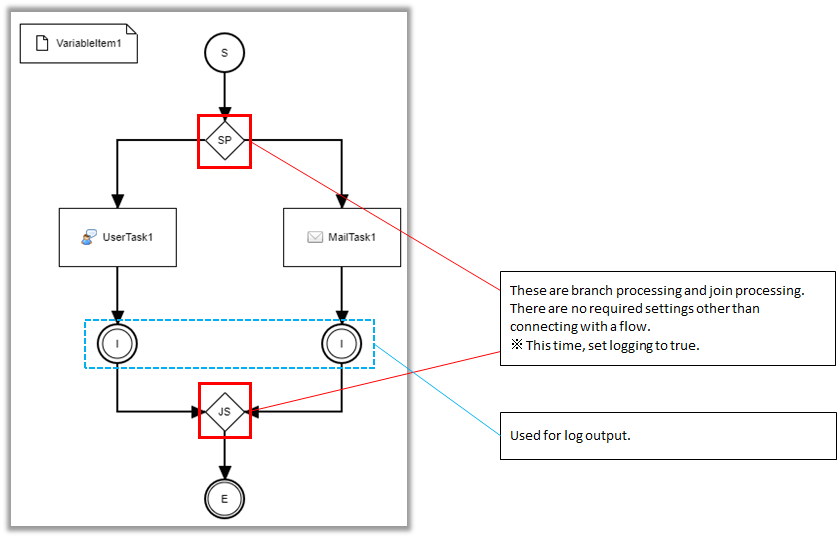
Set each item. Setting is not required for item names that are not listed.
-
StartEvent
Item name Setting value historyLogging
true
-
EndEvent
Item name Setting value historyLogging
true
-
SplitParallelGateway

項目名 設定値 historyLogging
true
-
JoinSyncGateway

項目名 設定値 historyLogging
true
-
IntermediateEvent1

項目名 設定値 historyLogging
true
-
IntermediateEvent2
項目名 設定値 historyLogging
true
-
UserTask1

Item name Setting value historyLogging
true
assignRule
referring assignRule
taskResultStatus
referring taskResultStatus
-
assignRule
Item name Setting value Type
ById
Apply flow name
*
Allocation type
ALL
Completion Conditions
ANYONE
Definition format
STRING
ID acquisition logic
authorizer@workflow
-
taskResultStatus
Item name Setting value name
post
displayName
Apply
-
-
MailTask1
Item name Setting value historyLogging
true
mailTemplateName
basic/SimpleWorkflow003
to
Item name Setting value Definition format
STRING
to acquisition logic
The workflow settings are now complete. Click the Save button to save.
From here on, we will explain the steps required to use the workflow.
-
Create Entity
Prepare an entity called "basic.BasicWorkflowEntity006". -
DetailFormView settings
Right-click the created Entity: "basic.BasicWorkflowEntity006", open "DetailLayout", after performing the standard load in the same way as simple approval, please set the following.Item name Setting value Workflow definition name
basic/BasicWorkflow006
Workflow variable name
variableItem1
Button display name
Split workflow activation
Message of running process
Split workflow is running.
Up to this point, you are ready to use this Workflow. Let’s try it from the next section.
Using Workflow
Please log in with an administrator account and start the workflow as well as a simple approval. Confirm that an e-mail is sent at the same time as the workflow was started
Check your workflow as you would for a simple approval.
Click the Apply button.
Check from the workflow history that all the branched flows are executed.
The above is a workflow that includes splits.
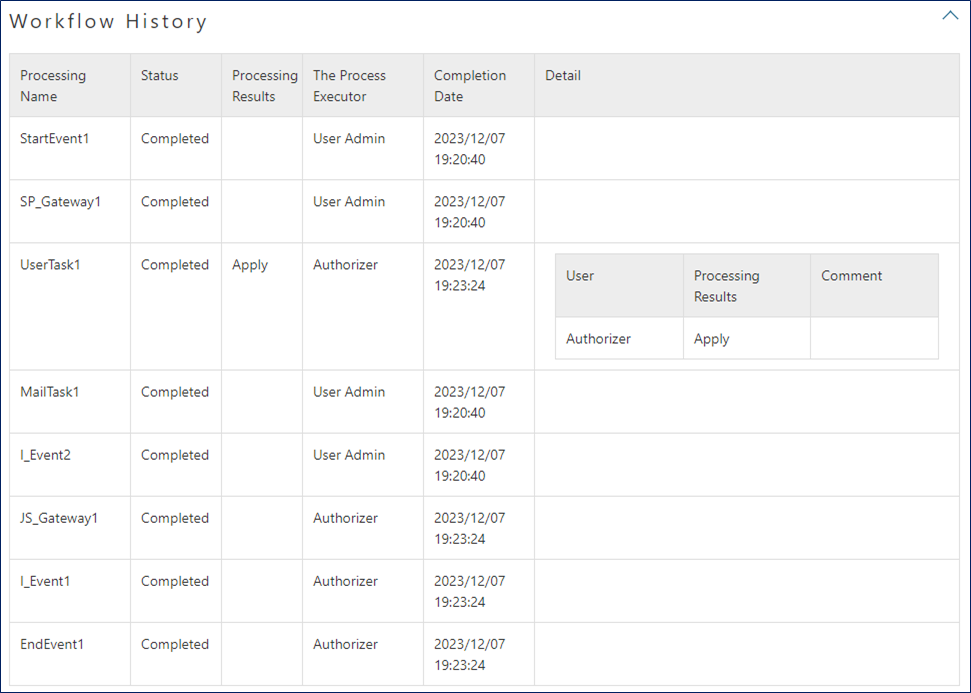
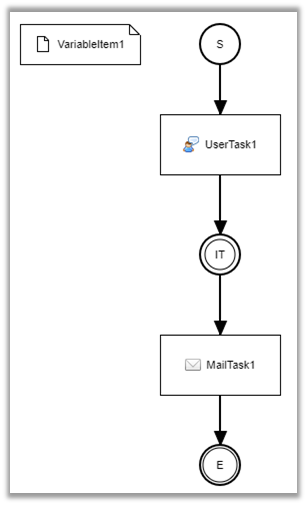
3.7. timer
This section mainly explains how to use Timer. The situation is, we want the mail to be sent after a few minutes when a user registered the data and received approval.

Preparation
Settings are required in mtp-service-config.xml.
Set useQueue to true as shown below.
When changing settings, you will need to restart the Tomcat server.
<!-- AsyncTask queue and counter setting -->
<service>
  <interface>org.iplass.mtp.impl.async.rdb.RdbQueueService</interface>
  <!-- if use async rdb service set to true -->
  <property name="useQueue" value="true" />
</service>
Workflow Settings
Create Workflow MetaData as follows.
| Item name | Setting value |
|---|---|
name |
basic/BasicWorkflow007 |
displayName |
BasicWorkflow007 |
description |
Timer |
Display the created workflow and create the workflow shown below. Refer to operation method for specific operations.
Set each item. Setting is not required for item that are not listed.
-
StartEvent
Item name Setting value historyLogging
true
-
EndEvent
Item name Setting value historyLogging
true
-
UserTask1

Item name Setting value historyLogging
true
assignRule
See assignRule
taskResultStatus
See taskResultStatus
-
assignRule
Item name Setting value Type
ById
Apply flow name
*
Allocation type
ALL
Completion Conditions
ANYONE
Definition format
STRING
ID acquisition logic
authorizer@workflow
-
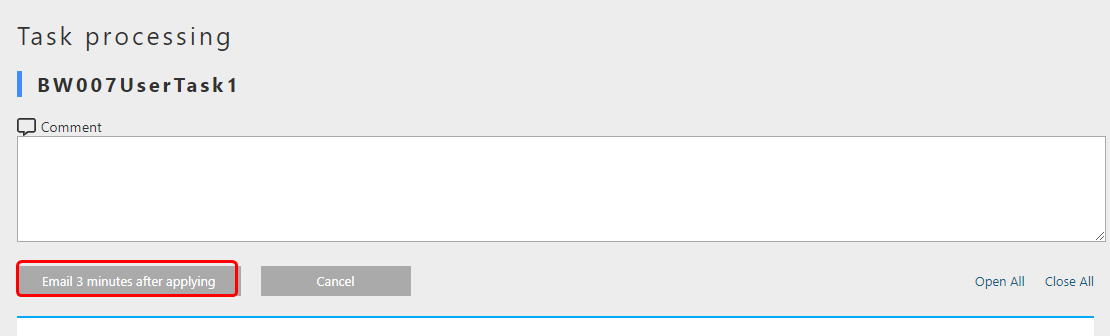
taskResultStatus
Item name
Setting value
name
post
displayName
Email 3 minutes after applying
-
-
IntermediateTimerEvent1

Item name Setting value historyLogging
true
timer
Item name Setting value Timer Type
Delay
Timer Unit
Minuites
Delay Expression
"3"
-
MailTask1
Item name Setting value historyLogging
true
mailTemplateName
basic/SimpleWorkflow003
mailTemplateName
Item name Setting value Definition format
STRING
to acquisition logic
The workflow settings are now complete. Click the Save button to save.
From here on, we will explain the steps required to use the workflow.
-
Create Entity
Prepare an entity called "basic.BasicWorkflowEntity007". -
DetailFormView settings
Right-click the created Entity: "basic.BasicWorkflowEntity007", open "DetailLayout", after performing the standard load in the same way as simple approval, please set the following.Item name Setting value Workflow definition name
basic/BasicWorkflow007
Workflow variable name
variableItem1
Button display name
Timer workflow start
Message of running process
Timer workflow is running.
Up to this point, you are ready to use this Workflow. Let’s try it from the next section.
Using Workflow
Please log in with an administrator account and start the workflow as well as a simple approval.
Check your workflow as you would for a simple approval.
Click the Email after 3 minutes button.
Make sure that the email is sent in 3 minutes.
This concludes the end of the basic workflow that includes a timer.
4. Practical Section
In the practical section, we will assemble complicated processes by combining multiple workflow functions.
4.1. Inquiry
Imagine such workflow to deal with customer inquiry: When the inquiry comes, start a workflow and assign the employee to respond, and then let the superior to approve the result. The simple flow is as follows.
Preparation
Prepare an entity named "practice.PracticeWorkflowEntity001". The values to be set are as follows.
-
Properties
Open the created Entity and add the following properties from the Properties tab.
| Name | DisplayName | Type | Others | ||||||||||
|---|---|---|---|---|---|---|---|---|---|---|---|---|---|
inquiryNo |
Inquiry number |
AutoNumber |
|
||||||||||
familyName |
Last Name |
String |
|||||||||||
firstName |
First Name |
String |
|||||||||||
familyNameReading |
Last Name Reading |
String |
|||||||||||
firstNameReading |
First Name Reading |
String |
|||||||||||
String |
|||||||||||||
content |
Content |
LongText |
|||||||||||
topic |
type |
Select |
Add the following value to LocalValue.
|
||||||||||
inquiryStatus |
Query Status |
Select |
Add the following value to LocalValue.
|
-
EventListeners
Add the following settings from the EventListeners tab.

| Type | Script | Events |
|---|---|---|
Script |
See below |
afterInsert |
import java.util.LinkedHashMap;
import java.util.Map;
import org.iplass.mtp.workflow.WorkflowManager;

def wm = manager(WorkflowManager.class);

Map<String, Object> parameters = new LinkedHashMap<String, Object>();
parameters.put("variableItem1", entity);

wm.startProcess("practice/PracticeWorkflow001", parameters);
The Entity settings are now complete. Click the Save button to save.
With this setting, Workflow will automatically starts after registering data in Entity.
Please prepare the following users. For users that have already been created, there is no need to prepare them again.
| User Id | Last Name | Mail Address | Member Of | Account Policy |
|---|---|---|---|---|
user001@workflow |
user001 |
GemUser |
Standard |
|
user002@workflow |
user002 |
GemUser |
Standard |
|
user003@workflow |
user003 |
GemUser |
Standard |
Workflow Settings
Create Workflow MetaData as follows.
| Item name | Setting value |
|---|---|
name |
practice/PracticeWorkflow001 |
displayName |
PracticeWorkflow001 |
description |
Query Management |
Display the created workflow and create the workflow shown below. Refer to operation method for specific operations.
We are going set each item. Setting is not required for item that are not listed.
-
StartEvent

Item name Setting value historyLogging
true
-
EndEvent

Item name Setting value historyLogging
true
-
UserTask1

Item name Setting value historyLogging
true
assignRule
referring assignRule
taskResultStatus
referring taskResultStatus
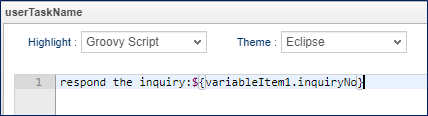
userTaskName
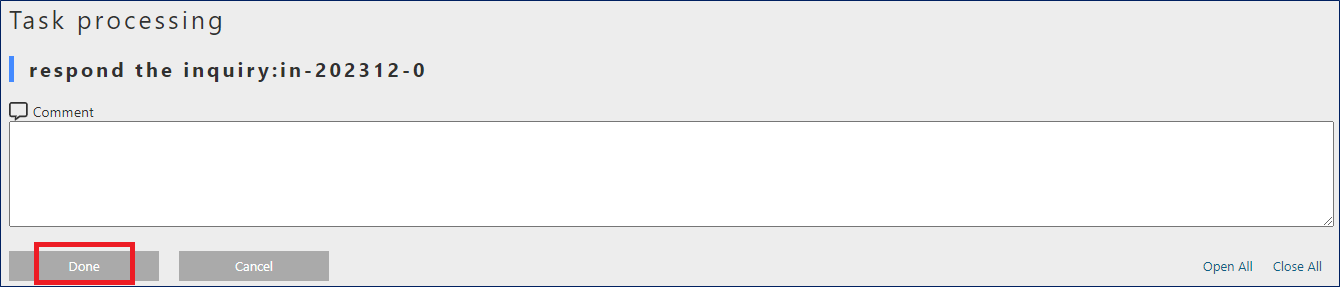
respond the inquiry:${variableItem1.inquiryNo}
-
assignRule
Item name Setting value Type
ById
Apply flow name
*
Allocation type
ALL
Completion Conditions
ANYONE
Definition Format
EQL
ID acquisition logic
state = 'V'
-
taskResultStatus
Item name Setting value name
ok
displayName
Done
-
-
UpdateEntityTask1

Item name Setting value historyLogging
true
variableName
variableItem1
updateRule
Item name Setting value Type
property
Property name
inquiryStatus
Updated value
3
-
UserTask2
Item name Setting value historyLogging
true
assignRule
See assignRule
taskResultStatus
See taskResultStatus
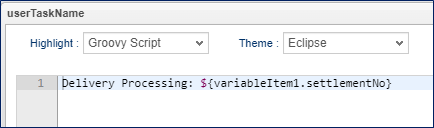
userTaskName
Approval for inquiries:${variableItem1.inquiryNo}
-
assignRule
Item name Setting value Type
ById
Apply flow name
*
Allocation type
ANYONE
Completion Conditions
ANYONE
Definition Format
EQL
ID acquisition logic
state = 'V'
-
taskResultStatus
Item name Setting value name
ok
displayName
Approve
Item name Setting value name
ng
displayName
Send back
-
-
SequenceFlow (UserTask2 → UpdateEntityTask3)
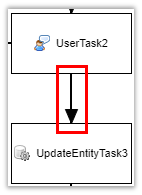
This is the flow for approval.
Item name Setting value nodeResultStatus
ok
-
SequenceFlow (UserTask2 → UpdateEntityTask2)
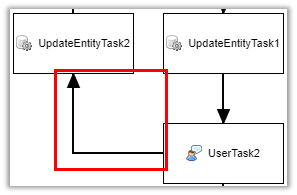
This is the flow for sending back.
Item name Setting value nodeResultStatus
ng
-
UpdateEntityTask2
Item name Setting value historyLogging
true
variableName
variableItem1
updateRule
Item name Setting value Type
property
Property name
inquiryStatus
Updated value
2
-
UpdateEntityTask3
Item name Setting value historyLogging
true
variableName
variableItem1
updateRule
Item name Setting value Type
property
Property name
inquiryStatus
Updated value
4
The workflow settings are now complete. Click the
Savebutton to save.
Up to this point, you are ready to use this Workflow. Let’s try it from the next section.
Using Workflow
Please log in with an administrator account and the workflow will start by registering data to "PracticeWorkflowEntity001".
Check your workflow as you would for a simple approval.
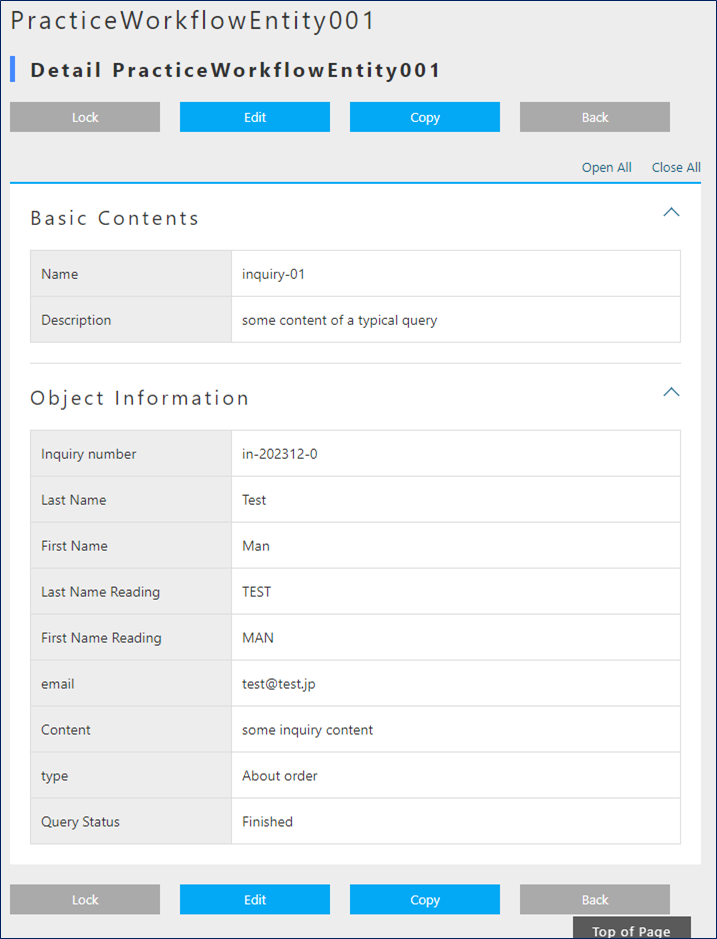
Log in as any user who is in charge (such as user001@workflow) and click the Done button.
It will no longer be displayed in MY tasks. Select "Created task". You can confirm that you are no longer the person in charge.
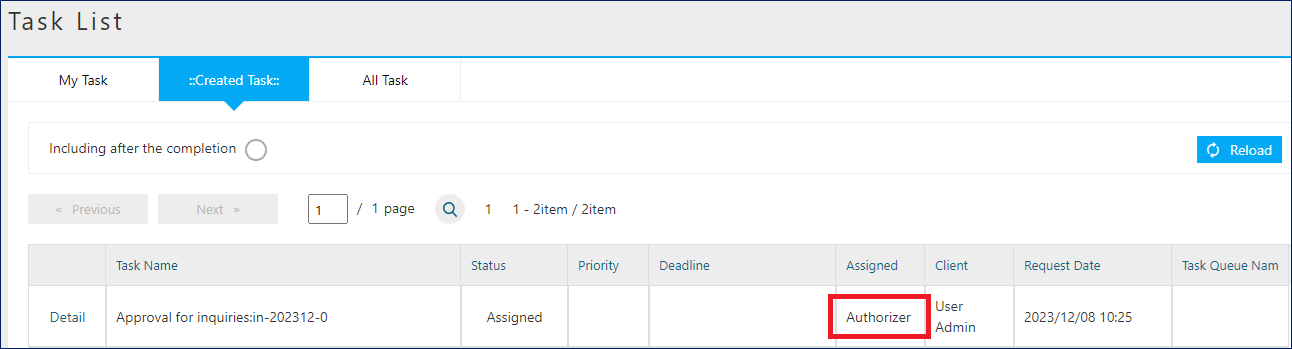
Log in as the assigned user and click the Approve button to complete the task.
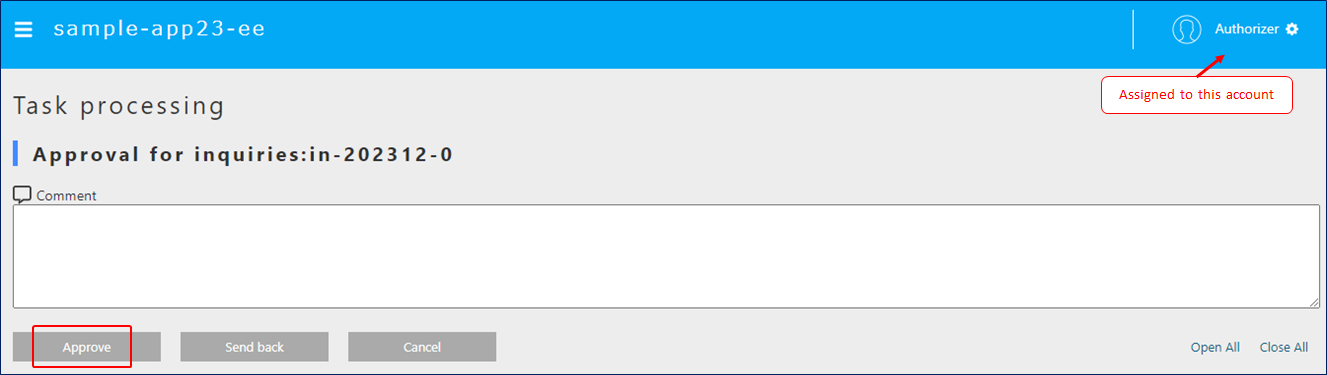
Log in as the person in charge and perform task processing.
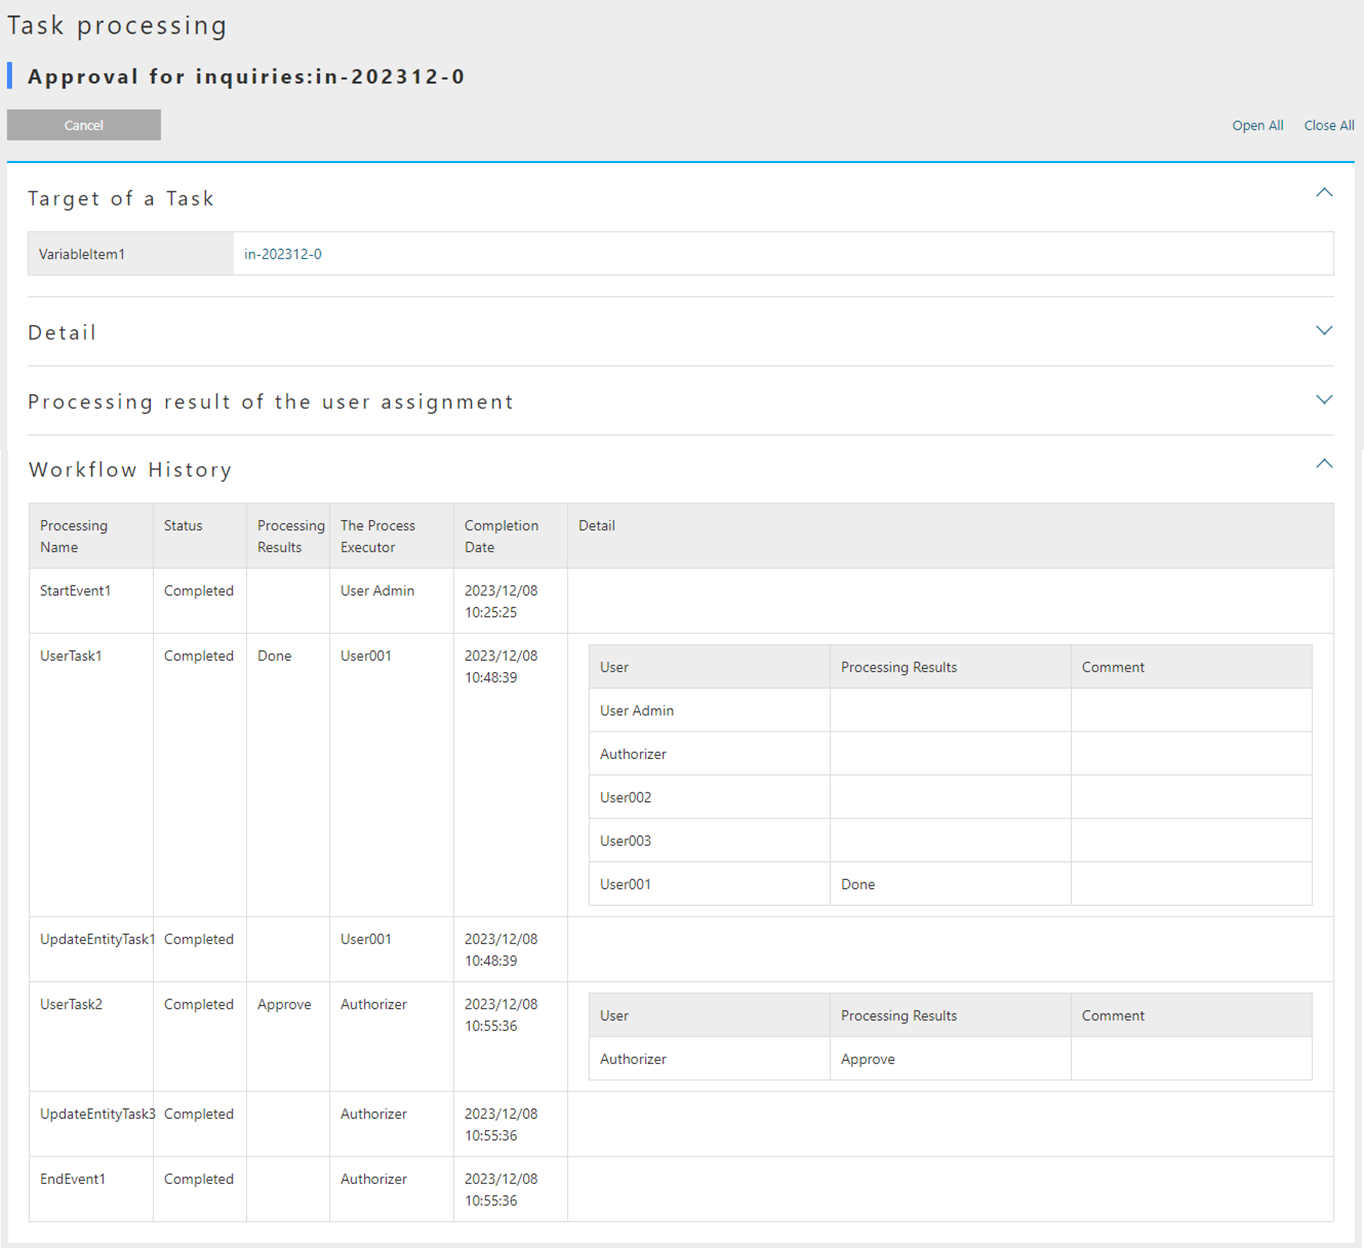
The above is the query management management workflow.
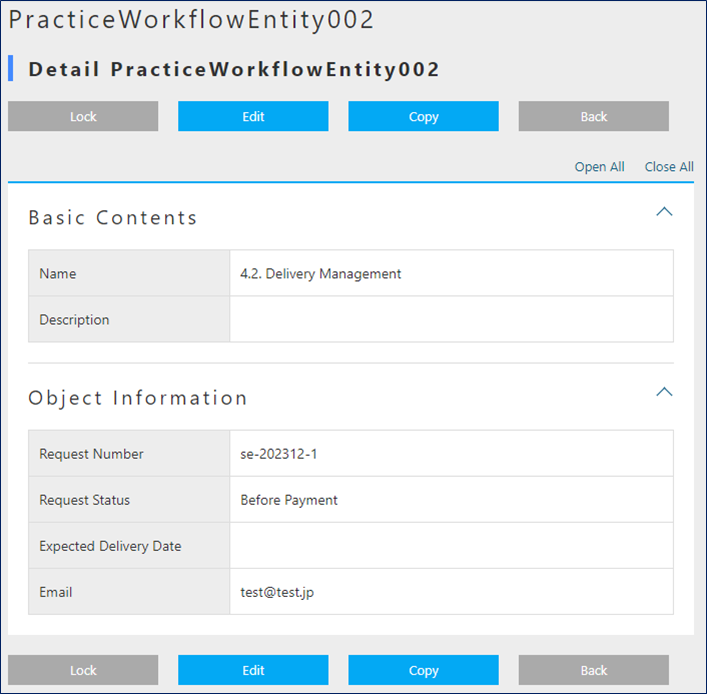
4.2. Delivery Management
Create a workflow to perform the allocation process using the queue.

preparation
Prepare an entity named "practice.PracticeWorkflowEntity002". The values to be set are as follows.
-
Properties
Open the created Entity and add the following properties from the Properties tab.

| Name | DisplayName | Type | |||||||||
|---|---|---|---|---|---|---|---|---|---|---|---|
settlementNo |
Request Number |
AutoNumber |
|
||||||||
settlementStatus |
Request Status |
Select |
Add the following value to LocalValue.
|
||||||||
deliverGoodsDate |
Expected Delivery Date |
Date |
|||||||||
orderMail |
String |
-
EventListeners
Add the following settings from the EventListeners tab.

| Type | Script | Events |
|---|---|---|
Script |
See below |
afterInsert |
import java.util.LinkedHashMap;
import java.util.Map;
import org.iplass.mtp.workflow.WorkflowManager;

def wm = manager(WorkflowManager.class);

Map<String, Object> parameters = new LinkedHashMap<String, Object>();
parameters.put("variableItem1", entity);
parameters.put("variableItem2", entity.orderMail);
wm.startProcess("practice/PracticeWorkflow002", parameters);
The Entity settings are now complete. Click the Save button to save.
With this setting, Workflow will automatically starts after registering data in Entity.
This time we will use UserTaskQueue. UserTaskQueue is a way to pool tasks into a queue without assigning them directly to users.
Perform the following steps to register the data for using UserTaskQueue in advance.
-
AdminConsole
From Menu under View Components, right-click EntityMenuItem to create the menu below and place it in the Menu Tree.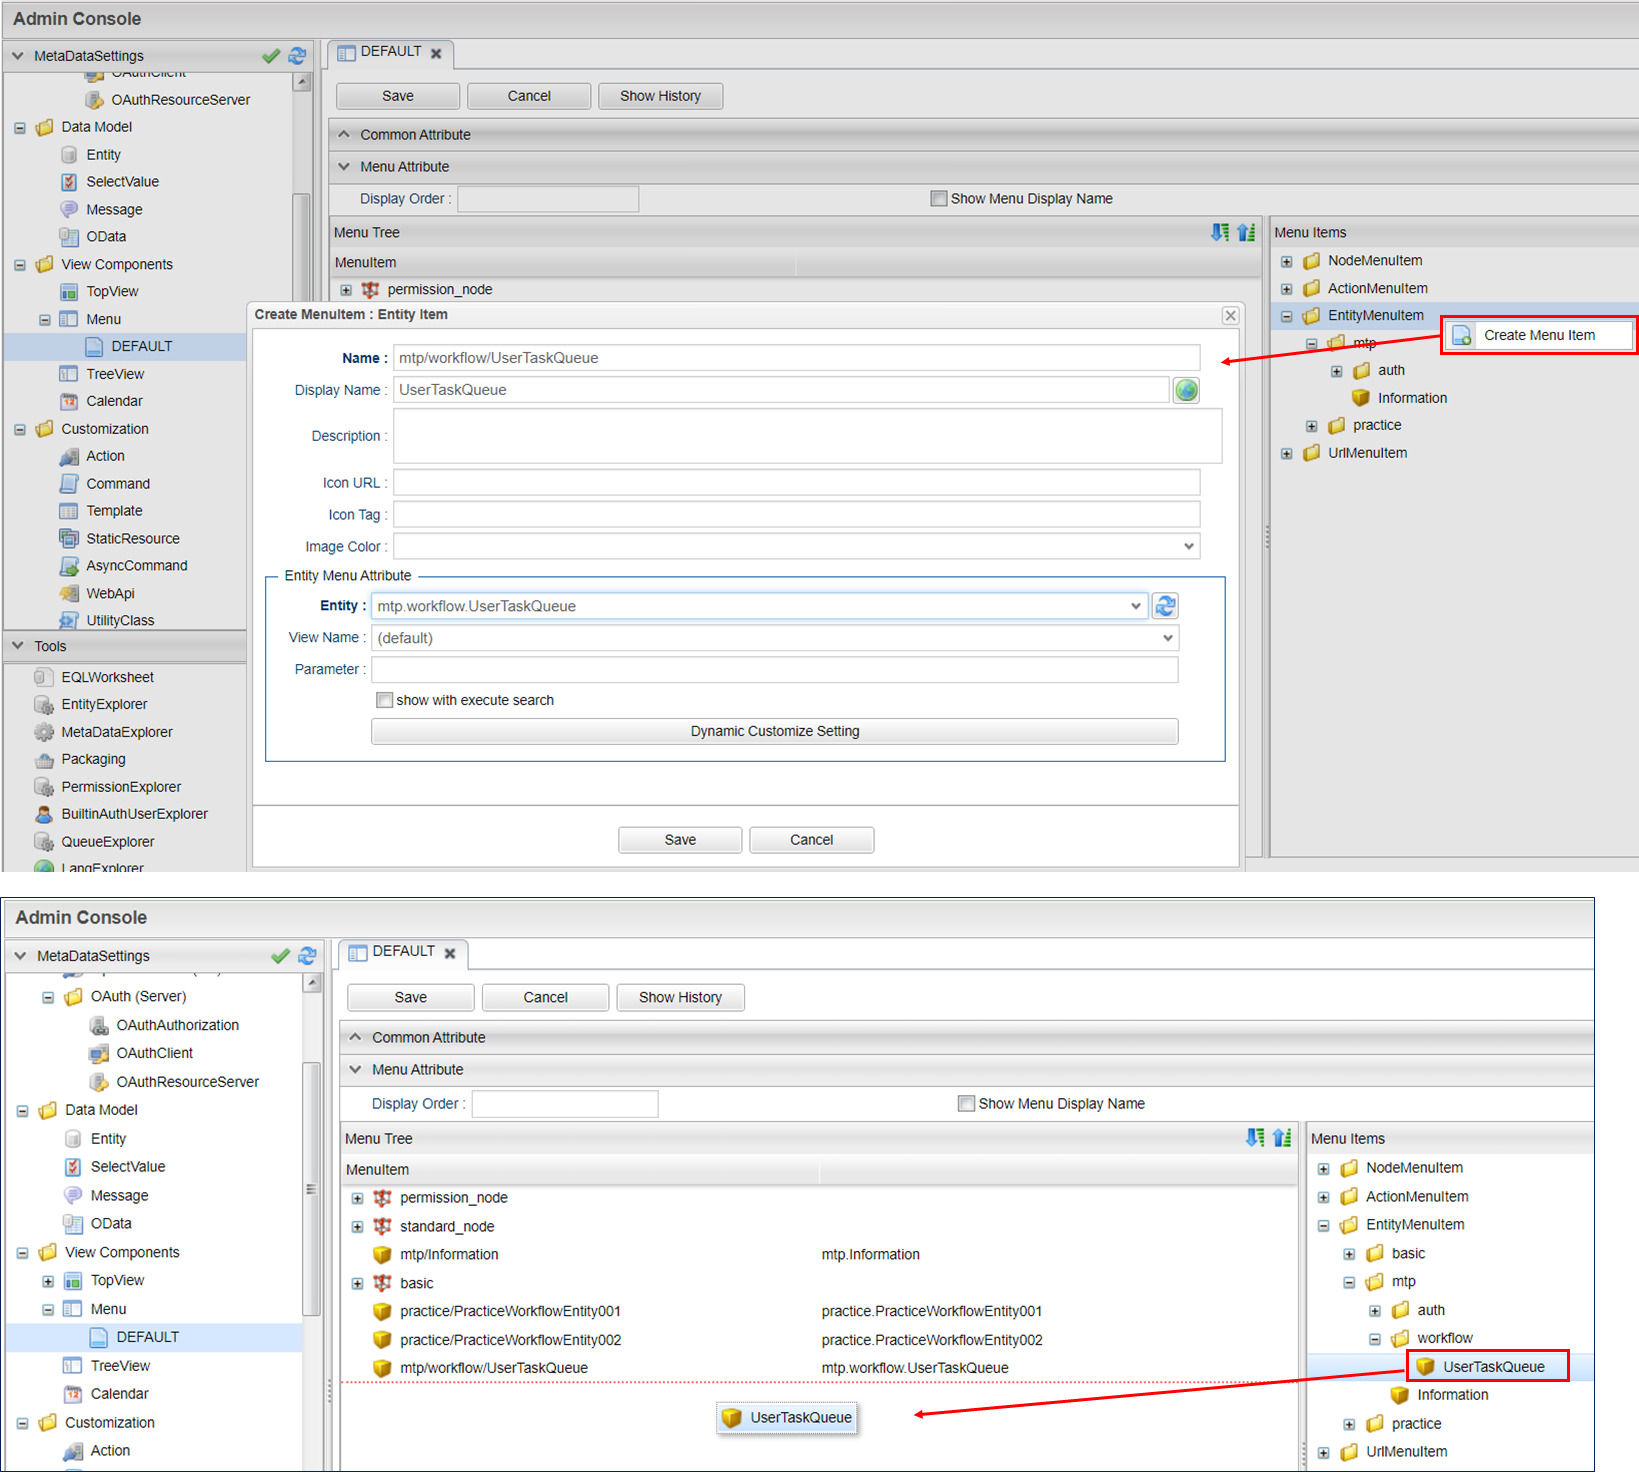
Item name Setting value name
mtp/workflow/UserTaskQueue
displayName
UserTaskQueue
entity
mtp.workflow.UserTaskQueue
-
GEM pages
Please update the GEM top screen and register the following data from the added UserTaskQueue menu screen.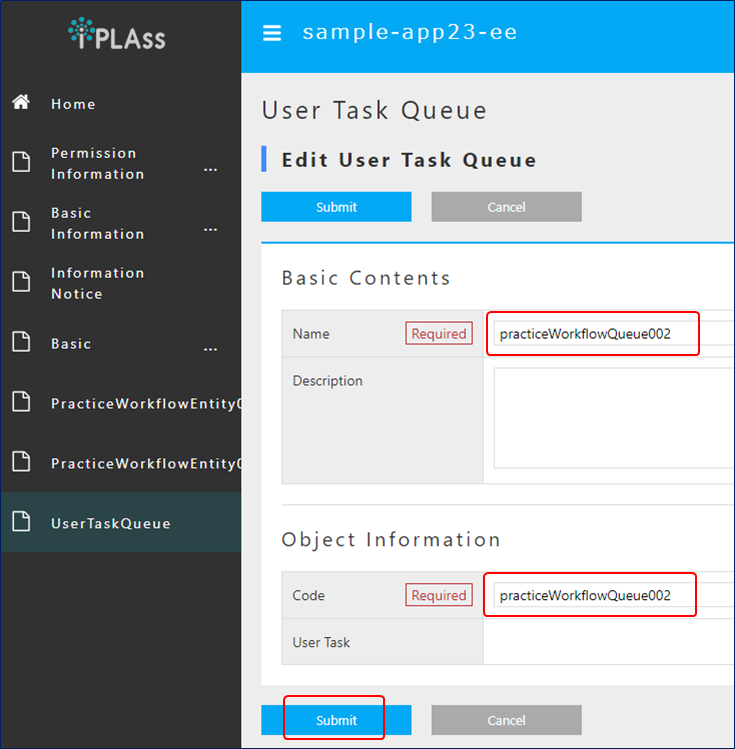
Item name Setting value BasicContents.Name
practiceWorkflowQueue002
ObjectInformation.Code
practiceWorkflowQueue002
Please prepare the following users. For users that have already been created, there is no need to prepare them again.
| User Id | Last Name | Mail Address | Member Of | Account Policy |
|---|---|---|---|---|
user001@workflow |
User001 |
GemUser |
Standard |
|
user002@workflow |
User002 |
GemUser |
Standard |
|
user003@workflow |
User003 |
GemUser |
Standard |
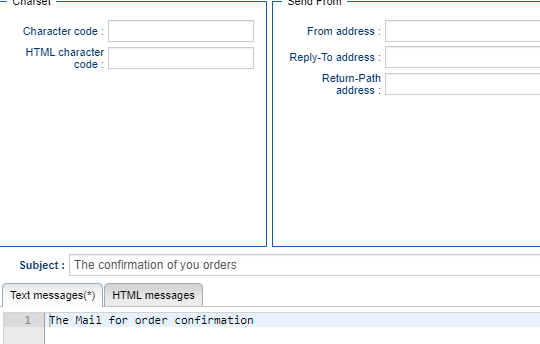
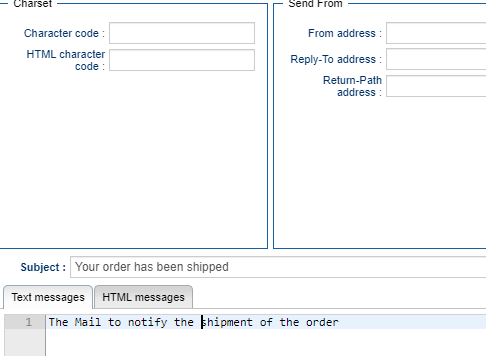
Prepare the following two MailTemplates.
-
practice/PracticeWorkflow002_001
-
practice/PracticeWorkflow002_002
| Name | Display Name | Description |
|---|---|---|
practice/PracticeWorkflow002_001 |
PracticeWorkflow002_001 |
Order Confirmation |
practice/PracticeWorkflow002_002 |
PracticeWorkflow002_002 |
Shipping your order |
Please set the Subject and Text message content as desired.
Prepare the following command.
-
practice/PracticeWorkflowCommand002
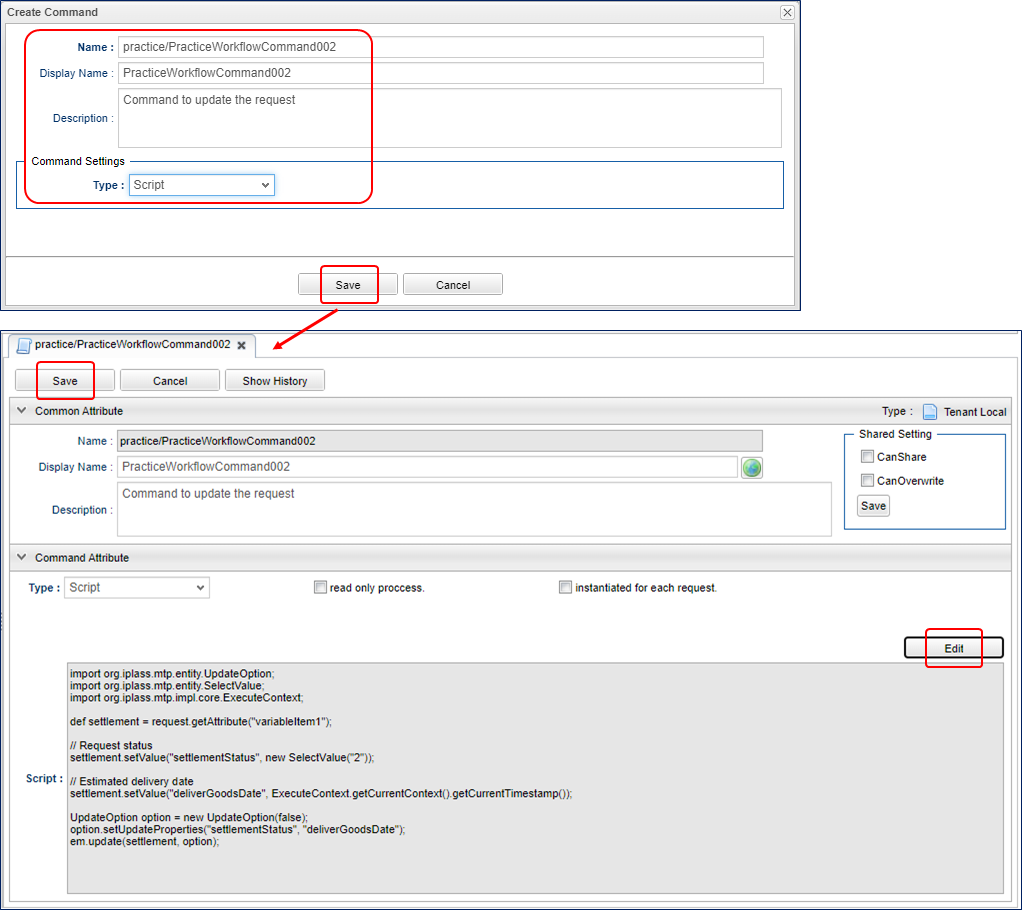
| Name | Display Name | Description | Type | Command Attribute |
|---|---|---|---|---|
practice/PracticeWorkflowCommand002 |
PracticeWorkflowCommand002 |
Command to update the request |
Script |
See below |
import org.iplass.mtp.entity.UpdateOption;
import org.iplass.mtp.entity.SelectValue;
import org.iplass.mtp.impl.core.ExecuteContext;

def settlement = request.getAttribute("variableItem1");

// Request status
settlement.setValue("settlementStatus", new SelectValue("2"));

// Estimated delivery date
settlement.setValue("deliverGoodsDate", ExecuteContext.getCurrentContext().getCurrentTimestamp());

UpdateOption option = new UpdateOption(false);
option.setUpdateProperties("settlementStatus", "deliverGoodsDate");
em.update(settlement, option);
Workflow Settings
Create Workflow MetaData as follows.
| Item name | Setting value |
|---|---|
name |
practice/PracticeWorkflow002 |
displayName |
PracticeWorkflow002 |
description |
Shipping Management |
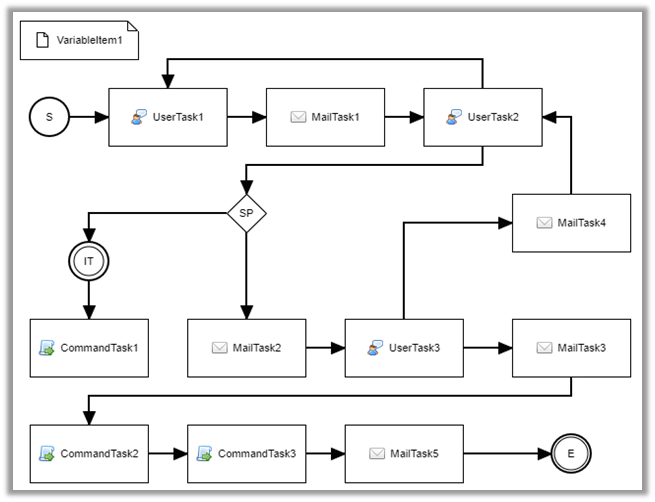
Display the created workflow and create the workflow shown below. Refer to operation method for specific operations.
Please set the properties for each item. Setting is not required for items that are not listed.
-
StartEvent
Item name Setting value historyLogging
true
-
EndEvent
Item name Setting value historyLogging
true
-
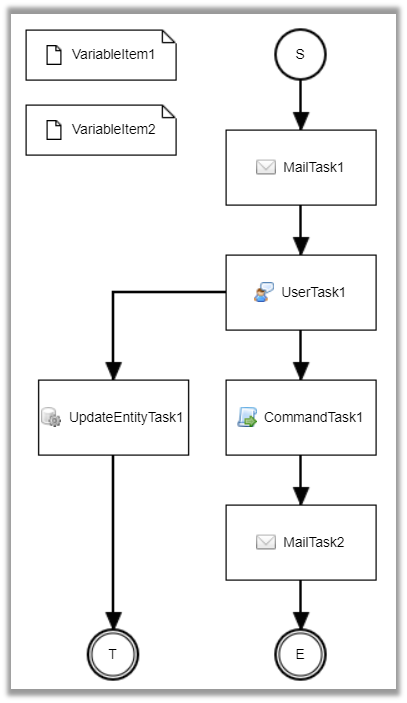
VariableItem2
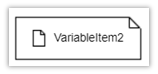
Item name Setting value name
variableItem2
displayName
VariableItem2
*This time, VariableItem is used separately from EntityData in order to retain the mail transmission destination.
-
MailTask1
Item name Setting value historyLogging
true
mailTemplateName
practice/PracticeWorkflow002_001
to
Item name Setting value Definition format
SCRIPT
to acquisition logic
variableItem2
-
UserTask1

Item name Setting value historyLogging
true
assignRule
referring assignRule
taskResultStatus
referring taskResultStatus
userTaskName
Delivery Processing: ${variableItem1.settlementNo}
-
assignRule
Item name Setting value Type
ToQueue
Apply flow name
*
Allocation type
ANYONE
Completion Conditions
ANYONE
QueueCode acquisition logic
return "practiceWorkflowQueue002";
We will set assignRule like we did before. This time we will use Queue. Set as shown below.
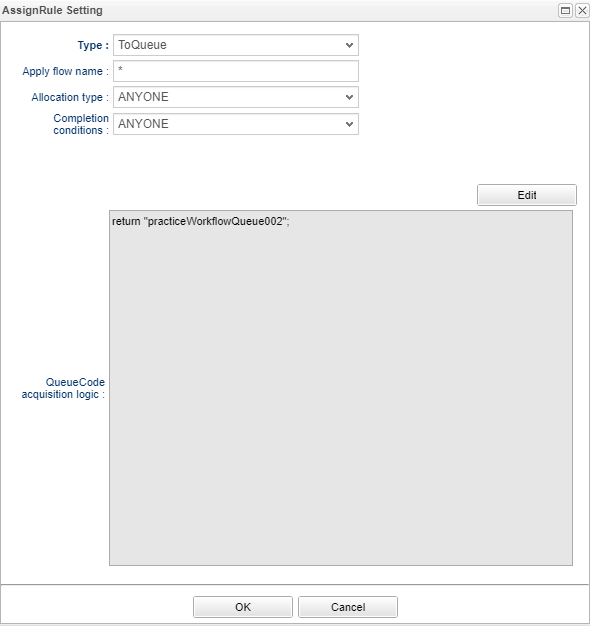
Note that if the UserTaskQueue registration workfor this workflow is not completed, an error will occur when executing the workflow.
-
taskResultStatus
Item name Setting value name
ok
displayName
Delivery Completed
Item name Setting value name
ng
displayName
Undeliverable
-
-
SequenceFlow (UserTask1 → CommandTask1)
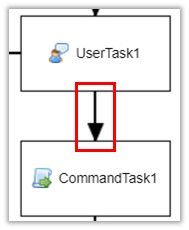
This is the flow for delivery completed.
Item name Setting value nodeResultStatus
ok
-
SequenceFlow (UserTask1 → UpdateEntityTask1)
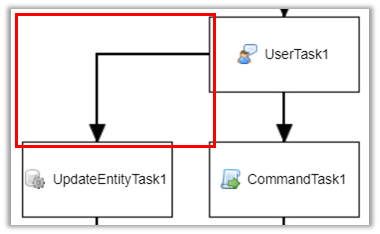
This is the flow for undeliverable.
Item name Setting value nodeResultStatus
ng
-
UpdateEntityTask1
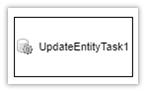
Item name Setting value historyLogging
true
variableName
variableItem1
updateRule
Item name Setting value Type
property
Property name
settlementStatus
Updated value
3
-
CommandTask1
Item name Setting value historyLogging
true
commandConfig
practice/PracticeWorkflowCommand002
-
MailTask2

Item name Setting value historyLogging
true
mailTemplateName
practice/PracticeWorkflow002_002
to
Item name Setting value Definition format
SCRIPT
to acquisition logic
variableItem2
The workflow settings are now complete. Click the
Savebutton to save.
Up to this point, you are ready to use this Workflow. Let’s try it from the next section.
Using Workflow
Please log in with an administrator account and the workflow will start by registering data to "PracticeWorkflowEntity002".
Please be sure to set a value in the email field to confirm email transmission.
An email will be sent to you upon registration.
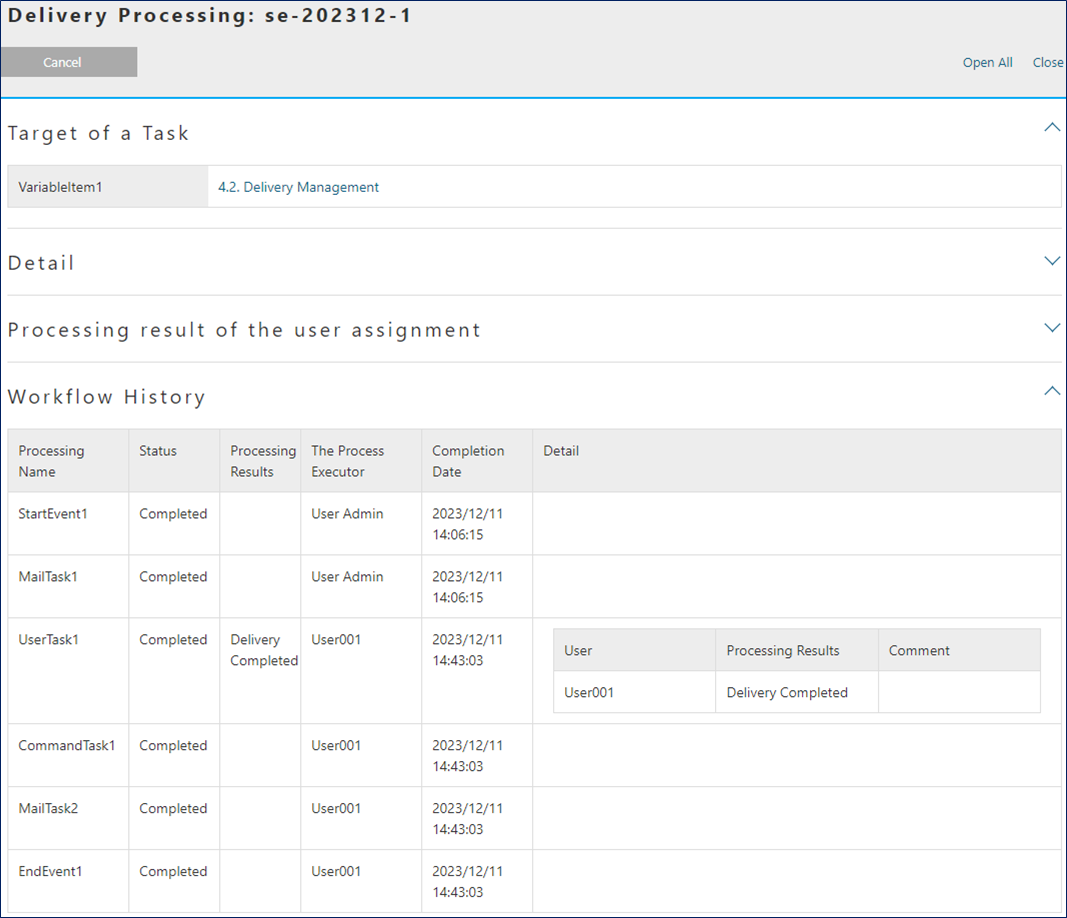
Check your workflow as you would for a simple approval.
Check the created task from the top screen of the administrator account.
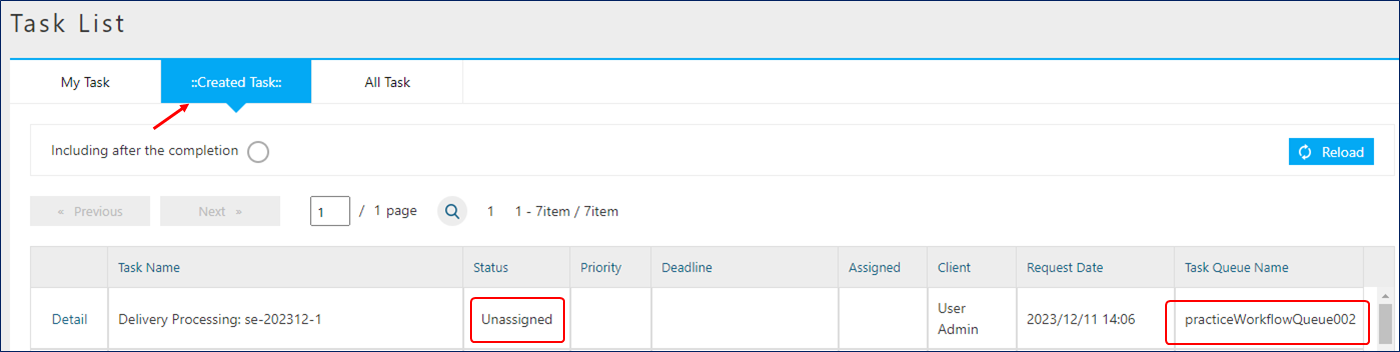
This time, since the assignment is to the task queue instead of the user, it will not be automatically added to MY tasks.
Log in with user ID: user001@workflow and assign the target task from all tasks.
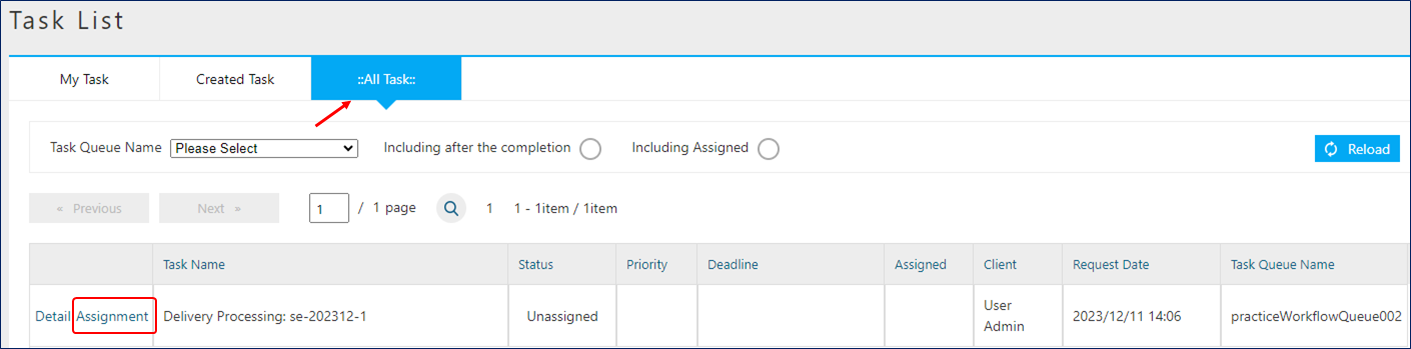
If you look at the MY task, you can see that it is already assigned.
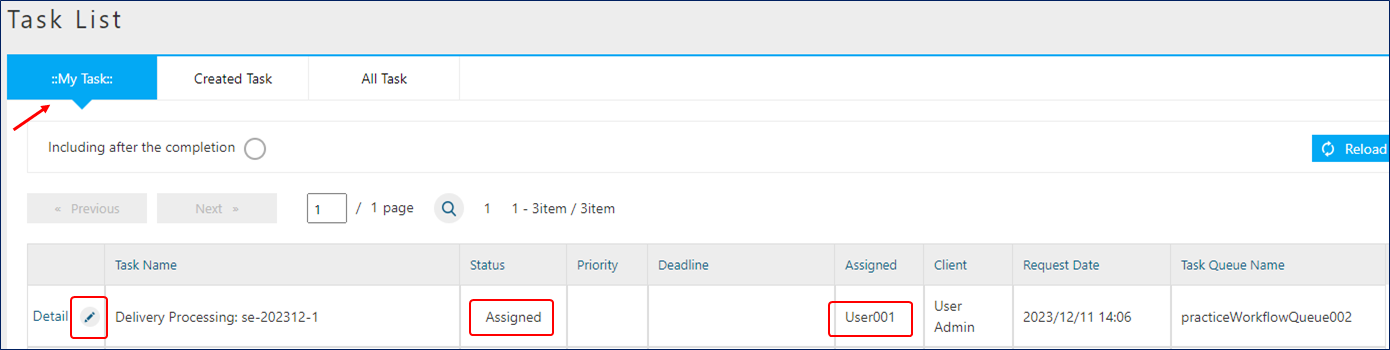
Click the Edit MY Task link to process the task.
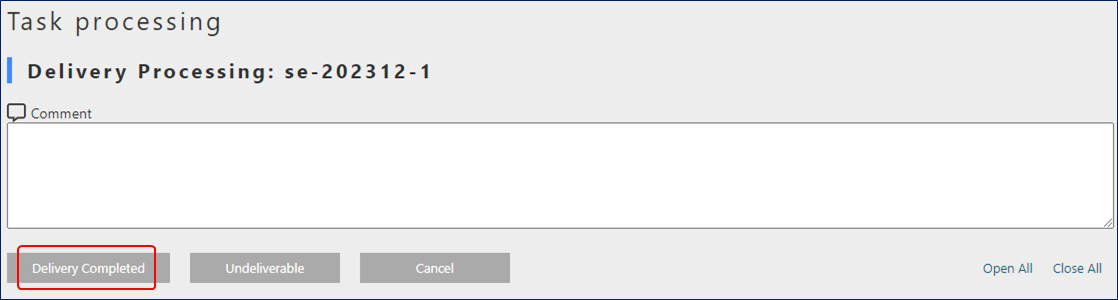
Click on Delivery Completed this time.
An email will be sent upon completion.
Additionally, if you click Undeliverable during task processing, the billing status will be treated as undeliverable.
The above is all for the delivery management workflow.
4.3. Minutes Approval
Imagine this situation: The designer want to use the data lock function to prevent changes once the minutes are approved.

In the flow with notification, the mail sending task is executed after the task is completed.
Preparation
Prepare an entity named "practice.PracticeWorkflowEntity003". The values to be set are as follows.
-
Properties
Open the created Entity and add the following properties from the Properties tab.

| Name | DisplayName | Type | multiple | Others | ||||
|---|---|---|---|---|---|---|---|---|
minutes |
Minutes |
Binary |
1 |
|||||
members |
Circulation Destination |
Reference |
* |
|
||||
authorizerList |
Authorizer List |
Binary |
1 |
The Entity settings are now complete. Click the Save button to save.
Please prepare the following users. For users that have already been created, there is no need to prepare them again.
| User Id | Last Name | Mail Address | Member Of | Account Policy |
|---|---|---|---|---|
user001@workflow |
user001 |
GemUser |
Standard |
|
user002@workflow |
user002 |
GemUser |
Standard |
|
user003@workflow |
user003 |
GemUser |
Standard |
Please prepare the following five MailTemplates.
| Name | Display Name | Description |
|---|---|---|
practice/PracticeWorkflow003_001 |
PracticeWorkflow003_001 |
Notice of minutes submission |
practice/PracticeWorkflow003_002 |
PracticeWorkflow003_002 |
Notification of approval/disapproval request |
practice/PracticeWorkflow003_003 |
PracticeWorkflow003_003 |
Approval notice |
practice/PracticeWorkflow003_004 |
PracticeWorkflow003_004 |
Notification of rejection |
practice/PracticeWorkflow003_005 |
PracticeWorkflow003_005 |
Completion notice |
Set the subject and content as desired.
Prepare the following command.
| Name | Display Name | Description | Type | Script |
|---|---|---|---|---|
practice/PracticeWorkflowCommand003_001 |
PracticeWorkflowCommand003_001 |
Automatic approval process |
Script |
|
practice/PracticeWorkflowCommand003_002 |
PracticeWorkflowCommand003_002 |
Approver list generation process |
Script |
|
practice/PracticeWorkflowCommand003_003 |
PracticeWorkflowCommand003_003 |
freeze |
Script |
-
practice/PracticeWorkflowCommand003_001 (Automatic approval process)
It is a process to automatically setting the target registered in the to "approve" even if "not approved" for a certain period (timer setting). This command is executed when the period set by the timer has passed.
import org.iplass.mtp.entity.query.Query;
import org.iplass.mtp.entity.query.condition.predicate.Equals;
import org.iplass.mtp.entity.EntityManager;
import org.iplass.mtp.entity.SearchResult;
import org.iplass.mtp.entity.SelectValue;
import org.iplass.mtp.entity.UpdateOption;
import org.iplass.mtp.workflow.Assignment;
import org.iplass.mtp.workflow.UserTask;

System.out.println("### START PracticeWorkflowCommand003_001");

// Retrieve the Workflow oid from the context
def workflowId = request.workflowInstanceId;

// Generate the definitionKey of UserTask(Workflow definition name + Usertask name + workflow ID)
def definitionKey = "practice/PracticeWorkflow003-" + "userTask3-" + workflowId;

// get UserTask
Query taskQuery = new Query()
    .selectAll("mtp.workflow.UserTask", false, false)
    .from("mtp.workflow.UserTask").where(new Equals("definitionKey", definitionKey));

UserTask userTask = (UserTask) em.searchEntity(taskQuery).getFirst();
String userTaskOid = userTask.getOid();

// get Assignment from UserTask.oid
Query assignmentQuery = new Query()
    .selectAll("mtp.workflow.Assignment", false, false)
    .from("mtp.workflow.Assignment")
    .where(new Equals("task.oid", userTaskOid));
SearchResult<Assignment> assignment = em.searchEntity(assignmentQuery);

for (Assignment e : assignment) {
  String assignState = e.getAssignState().getValue();
  System.out.println("assignState : " + assignState);

  // Update all assignments which no action were taken to Completed
  if ("ASSIGNED".equals(assignState)) {
    UpdateOption option = new UpdateOption();
    option.setUpdateProperties("assignState", "taskResult", "comment");
    e.setAssignState(new SelectValue("COMPLETED"));
    e.setComment("Automatic Approval");
    e.setTaskResult("ok");
    em.update(e, option);
  }
}-
practice/PracticeWorkflowCommand003_002(Approver list generation process)
Acquire only "Approved" users (including automatic approval) and then create a CSV file. It is also the process of registering the created file in the minutes workflow entity.
import org.iplass.mtp.entity.query.Query;
import org.iplass.mtp.entity.query.condition.predicate.Equals;
import org.iplass.mtp.entity.BinaryReference;
import org.iplass.mtp.entity.EntityManager;
import org.iplass.mtp.entity.SearchResult;
import org.iplass.mtp.entity.UpdateOption;
import org.iplass.mtp.workflow.Assignment;
import org.iplass.mtp.workflow.UserTask;

import java.io.ByteArrayInputStream;
import java.io.InputStream;
import java.io.IOException;

System.out.println("### PracticeWorkflowCommand003_002");

// Get wokrflow oid from context
def workflowId = request.workflowInstanceId;
System.out.println("### worflowId : " + workflowId);

// Generate the definitionKey of UserTask(Workflow definition name + Usertask name + workflow ID)
def definitionKey = "practice/PracticeWorkflow003-" + "userTask3-" + workflowId;

// get UserTask
Query taskQuery = new Query()
    .selectAll("mtp.workflow.UserTask", false, false)
    .from("mtp.workflow.UserTask")
    .where(new Equals("definitionKey", definitionKey));

UserTask userTask = (UserTask) em.searchEntity(taskQuery).getFirst();
String userTaskOid = userTask.getOid();

// Get Assignment from UserTask.oid
Query AssignmentQuery = new Query()
    .selectAll("mtp.workflow.Assignment", false, true)
    .from("mtp.workflow.Assignment")
    .where(new Equals("task.oid", userTaskOid));

SearchResult<Assignment> assignment = em.searchEntity(AssignmentQuery);

// Approver list generation
def authorizerList = "";
for (Assignment e : assignment) {
    if ("ok".equals(e.taskResult)) {
        authorizerList = authorizerList + e.user.name + "\r\n";
    }
}

// Create InputStream to use BinaryReference from Approver information String
InputStream is = new ByteArrayInputStream(authorizerList.getBytes());

// create BinaryReference
BinaryReference br = em.createBinaryReference("approverList.csv", "text/csv", is);

// Close stream
try {
  is.close();
} catch (IOException e) {
  e.printStackTrace();
}

// operation on Entity
def entity = request.getAttribute("variableItem1");
entity.setValue("authorizerList", br);

// update
UpdateOption option = new UpdateOption();
option.setUpdateProperties("authorizerList");
em.update(entity, option);-
practice/PracticeWorkflowCommand003_003(Freeze)
This process locks the registered minutes, circulation user, and approver list so that they cannot be updated.
import org.iplass.mtp.entity.query.Query;
import org.iplass.mtp.entity.query.condition.predicate.Equals;
import org.iplass.mtp.entity.EntityManager;
import org.iplass.mtp.entity.UpdateOption;

System.out.println("### PracticeWorkflowCommand003_003");

// Get workflow oid from context
def workflowId = request.workflowInstanceId;

// Get WorkflowTarget from workflowId
Query workflowTargetQuery = new Query()
    .select("targetEntityOid")
    .from("mtp.workflow.WorkflowTarget")
    .where(new Equals("workflow.oid", workflowId));

def workflowTarget = em.searchEntity(workflowTargetQuery).getFirst();

// Entities to be freezed
def entity = em.lockByUser(workflowTarget.targetEntityOid, "practice.PracticeWorkflowEntity003");
Workflow Settings
Create Workflow MetaData as follows.
| Item name | Setting value |
|---|---|
name |
practice/PracticeWorkflow003 |
displayName |
PracticeWorkflow003 |
description |
Meeting Approval |
Display the created workflow and create the workflow shown below. Refer to operation method for specific operations.
Let’s set the property for each item. Setting is not required for items that are not listed.
-
UserTask1

Item name Setting value assignRule
See assignRule
taskResultStatus
See taskResultStatus
-
assignRule
Item name Setting value Type
ById
Apply flow name
*
Allocation type
ANYONE
Completion Conditions
ANYONE
Definition format
STRING
ID acquisition logic
authorizer@workflow
-
taskResultStatus
Item name Setting value name
post
displayName
Submit minutes
-
-
MailTask1
Item name Setting value mailTemplateName
practice/PracticeWorkflow003_001
to
Item name Setting value Definition format
STRING
to get logic
any address
-
UserTask2
Item name Setting value assignRule
See assignRule
taskResultStatus
See taskResultStatus
-
assignRule
Item name Setting value Type
ById
Apply flow name
*
Allocation type
ALL
Completion Conditions
ANYONE
Definition format
STRING
ID acquisition logic
authorizer@workflow
-
taskResultStatus
Item name Setting value name
memberset
displayName
circulation destination set
Item name Setting value name
ngminutes
displayName
Return the minutes
-
-
MailTask2
Item name Setting value mailTemplateName
practice/PracticeWorkflow003_002
to
Item name Setting value Definition format
STRING
to get logic
any address
-
IntermediateTimerEvent1

Item name Setting value timer
Item name Setting value Timer Type
Delay
Timer Unit
Minuites
Delay Expression
"3"
-
CommandTask1

Item name Setting value commandConfig
practice/PracticeWorkflowCommand003_001
-
UserTask3
Item name Setting value assignRule
See assignRule
taskResultStatus
See taskResultStatus
-
assignRule
Item name Setting value Type
ById
Apply flow name
*
Allocation type
ALL
Completion Conditions
VOTE
Definition Format
SCRIPT
ID acquisition logic
See code below
Obtaining account ID set in members of the target Entity.
import org.iplass.mtp.entity.query.Query; import org.iplass.mtp.entity.query.condition.predicate.Equals; import org.iplass.mtp.entity.EntityManager; Query membersQuery = new Query() .select("members.accountId") .from("practice.PracticeWorkflowEntity003") .where(new Equals("oid", variableItem1.oid)); def em = manager(EntityManager.class); def members = em.searchEntity(membersQuery).getList(); def result = []; int cnt = 0; for (def e : members) { System.out.println(e.members.accountId); result[cnt] = e.members.accountId; cnt ++; } return result; -
taskResultStatus
Item name Setting value name
ok
displayName
Approve
Item name Setting value name
ng
displayName
Reject
-
-
MailTask3
Item name Setting value mailTemplateName
practice/PracticeWorkflow003_003
to
Item name Setting value Definition format
STRING
to get logic
any address
-
MailTask4
Item name Setting value mailTemplateName
practice/PracticeWorkflow003_004
to
Item name Setting value Definition format
STRING
to get logic
any address
-
CommandTask2
Item name Setting value commandConfig
practice/PracticeWorkflowCommand003_002
-
CommandTask3
Item name Setting value commandConfig
practice / PracticeWorkflowCommand003_003
-
MailTask5
Item name Setting value mailTemplateName
practice/PracticeWorkflow003_005
to
Item name Setting value Definition format
STRING
to get logic
any address
-
SequenceFlow (UserTask2 → UserTask1)
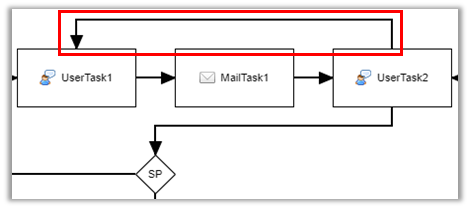
This is the flow for return the minutes.
Item name Setting value nodeResultStatus
ngminutes
-
SequenceFlow (UserTask2 → SP)
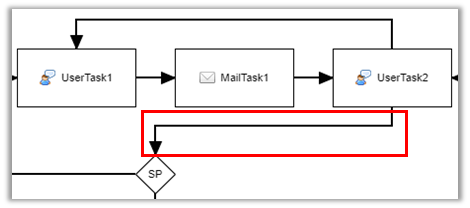
This is the flow for the circulation destination set (approval route).
Item name Setting value nodeResultStatus
memberset
-
SequenceFlow (UserTask3 → MailTask4 → UserTask2)
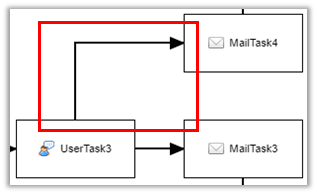
The flow for reject.
Item name Setting value nodeResultStatus
ng
-
SequenceFlow (UserTask3 → MailTask3)
Item name Setting value nodeResultStatus
ok
The workflow settings are now complete. Click the
Savebutton to save.
Up to this point, you are ready to use this Workflow. Let’s try it from the next section.
From here, it will the prerequisite works so to use the workflow created in the previous operation.
-
DetailFormView settings
Open the "DetailLayout" of "practice.PracticeWorkflowEntity003" created in Preparation, After performing the standard load in the same way as simple approval, please set the following.Item name Setting value Workflow definition name
practice/PracticeWorkflow003
Workflow variable name
variableItem1
Button display name
Minute workflow launch
Message of running process
The minutes workflow is running.
-
SearchLayout settings
Open "SearchLayout" of "practice.PracticeWorkflowEntity003" and save after performing standard load.
Up to this point, you are ready to use this Workflow. Let’s use Workflow in the next section.
Using Workflow
Log in with an administrator account, create any data in the Entity in the same way as simple approval, and then start the workflow.
Object information will be added in a later step, so leave it unset here.
Check your workflow as you would for a simple approval.
Log in with user ID: authorizer@workflow and
Click the "Edit" link for userTask1 in the task list on the top screen.
When you click the link in "Task target data" on the displayed "Task processing" edit screen, the Entity details screen will be displayed as a dialog, so click the Edit button.
On the edit screen that appears, register any file (docx, xlsx, txt, etc.) in the minutes and save it.
After that, enter any comments on the "Task Processing" edit screen and click the Submit minutes button to proceed with the flow.
You will be notified by email when you click the Submit minutes button.
Register the circulation destination and execute the circulation destination set.
Log in with user ID: authorizer@workflow,
Click the "Edit" link for userTask2 in the task list on the top screen.
Similar to when registering minutes, select the following circulation destination on the Entity data editing screen and save.
-
user001@workflow
-
user002@workflow
-
user003@workflow
The user set here becomes the approver/denier.
After that, enter any comments on the userTask2 edit screen and click the set circulation destination button to proceed with the flow.
You will be notified by email when you click the circulation destination set button.
Approve the record with the specified user or wait for the time set by the timer. An email notification will be sent when the approval judgment is completed.
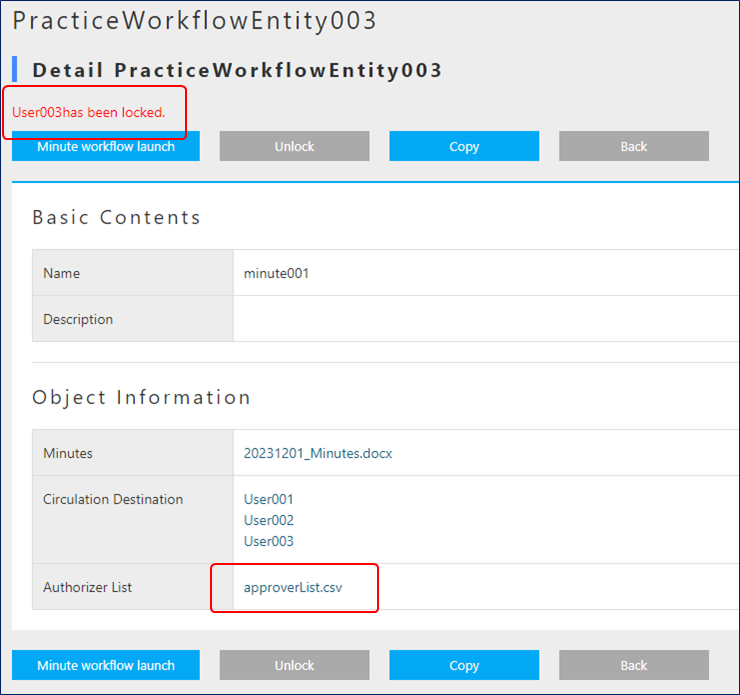
When the workflow is complete, verify that the approver list is registered and locked.
The above is the minutes approval workflow.
5. Next step
If you want to know the very details about the workflow mentioned in this tutorial, please refer to the Developer Guides of Workflow.
If you want to understand the details of other features, please refer to the content list of the Developer Guide and modify the definitions according to the requirements of your specific situations.